Lasernet Core 11.1 introduced new Lasernet branding to Lasernet Core. In addition to visual changes, various application directory paths changed.
As a result, users of Lasernet Core 11.0 who want to upgrade to Lasernet Core 11.1 or later must follow the process described in this article.
Note
This process applies to Lasernet Core 11.0 only. Because the installation path changed between Lasernet Core 11.0 and 11.1, a standard upgrade is not possible.
Users of Lasernet Core 10 and earlier who want to upgrade to Lasernet Core 11.1 or later must follow the Lasernet Core 11 Migration Guide.
For all other upgrades, follow the Lasernet Core Upgrade Guide.
The Upgrade Process
The following process summary introduces each stage of upgrading from Lasernet Core 11.0 to Lasernet Core 11.1 or later. Steps for each stage follow the summary.
Upgrade Process Summary
Make a comprehensive record of how Lasernet Core 11.0 services are configured. This includes basic configuration such as the Lasernet Config Server’s database connection and the port configuration for Lasernet Core environments, in addition to advanced configuration (if used; for example, external authentication for users).
Optional: Back up the Lasernet Core configurations hosted by the Lasernet Config Server.
Update the Lasernet Core configurations hosted by the Lasernet Config Server.
Steps for Each Process Stage
The following sections describe how to complete each part of the upgrade process.
1. Make a Comprehensive Record of How Lasernet Core 11.0 Services Are Configured
This upgrade process involves uninstalling Lasernet Core 11.0 and then installing and configuring Lasernet Core 11.1 or later. As a result, it is important that you record all aspects of how Lasernet Core 11.0 is configured, so that you can configure the new version of Lasernet Core 11 later.
Settings in Lasernet Service Manager
Start Lasernet Service Manager.
Double-click Lasernet Config 11 to display the Lasernet Config Server’s configuration window. Click through each tab of the window to see all aspects of the configuration and make comprehensive notes of the current settings and properties.
Repeat the previous step for all Lasernet Core environments listed in Lasernet Service Manager.
Settings in the Lasernet Core Administration Tool
Sign in to the Lasernet Core Administration Tool and make notes of the current system configuration.
Lasernet Printer Service and Lasernet OCR
If you are using the Lasernet Print Service or Lasernet OCR, make notes of the current configuration.
Some Settings Are Stored in the Lasernet Config Database
Some aspects of Lasernet Core configuration, such as users, groups, and security roles, are stored in the Lasernet Config database. They are restored when you connect the new version of Lasernet Core 11 to the existing Lasernet Config database.
2. Optional: Back Up the Lasernet Core Configurations Hosted by the Lasernet Config Server
Export any critical Lasernet Core workflows (configurations) hosted by the Lasernet Config Server as .lnconfigx files.
Note
This step is optional but recommended.
Although the Lasernet configurations should be available in the new version of Lasernet Core 11 after you connect the Lasernet Config Server to the existing Lasernet Config database, backups will enable you to restore them if necessary.
3. Remove Lasernet Core Windows Services
You must remove Lasernet Core environment Windows services and also Lasernet Printer Service services (if used).
Remove Lasernet Core Environment Services
To remove all Lasernet Core environment services, follow these steps:
Start Lasernet Service Manager.
Click a Lasernet Core environment.
Click Remove.
In the Remove service(s) window, click Yes. Lasernet Core removes the environment and deletes its Windows service.
Repeat the steps above for all Lasernet Core environments.
Note
You do not need to remove the Lasernet Config 11 service.
Remove Lasernet Printer Service Services
To remove these services, refer to Uninstall Printer Services.
4. Uninstall Lasernet Core 11.0
To uninstall Lasernet Core 11.0, follow these steps:
Open the Windows Apps and features window.
In the app list, click each of the following apps and then click Uninstall.
Lasernet 11
Lasernet Developer 11
Repeat the previous step for optional apps such as Lasernet Printer Service 11 and Lasernet OCR.
5. Restart the Lasernet Core Server
Restart the Lasernet Core server. This step is optional, but is recommended.
6. Delete Lasernet Core 11.0 Directories
Important
The instructions that you follow at this stage depend on whether any other Formpipe or Lasernet Group software is installed.
Follow the section below that applies to you:
If No Other Formpipe or Lasernet Group Software Is Installed
If Other Formpipe or Lasernet Group Software Is Installed
Note
By default, Windows hides some of the following directories. To reveal them, select the Windows File Explorer option to Show hidden files, folders, and drives.
If No Other Formpipe or Lasernet Group Software Is Installed
Delete the following Lasernet Core 11.0 directories:
C:\Program Files\Formpipe SoftwareNote
If Lasernet Server was installed to a non-default directory, delete that directory instead.
C:\ProgramData\Formpipe SoftwareFor each user on the server:
C:\Users\<user name>\AppData\Local\Formpipe SoftwareC:\Users\<user name>\AppData\Local\Formpipe_Software(Lasernet OCR only)
If Other Formpipe or Lasernet Group Software Is Installed
The default installation path for most other Formpipe and Lasernet Group software is C:\Program Files\Formpipe Software. The only exceptions to this are Lasernet Keep 11.1 (and later) and Lasernet Core 11.1 (and later), which by default are installed to C:\Program Files\Lasernet.
As a result, to avoid corrupting any current software installations, if any Formpipe or Lasernet Group software (other than Lasernet Keep 11.1 or later) is currently installed, you must delete the Lasernet 11-specific directories from the Formpipe Software directories, instead of deleting the Formpipe Software directories themselves.
Delete these directories:
C:\Program Files\Formpipe Software\Lasernet 11C:\ProgramData\Formpipe Software\Lasernet 11
For each user on the server:
Delete
C:\Users\<user name>\AppData\Local\Formpipe Software\Lasernet 11If Lasernet 11 OCR was installed:
Go to
C:\Users\<user name>\AppData\Local\Formpipe_Software\Look inside each directory there and locate the directory that contains a
11.0.0.0subdirectory.Delete this directory (whose name will contain
LNOCR.exe_Url_followed by a random sequence of letters).
7. Delete the Lasernet Core 11.0 Registry Keys
To delete the Lasernet Core 11.0 registry keys, follow these steps:
Start the Windows Registry Editor:
Click the Windows Start button.
Enter regedit.
Right-click Registry Editor and then click Run as administrator.
Locate the following key:
Computer\HKEY_LOCAL_MACHINE\SOFTWARE\Formpipe Software.Within that key, delete any subkeys that are clearly related to Lasernet 11. For example:
Computer\HKEY_LOCAL_MACHINE\SOFTWARE\Formpipe Software\Lasernet 11Computer\HKEY_LOCAL_MACHINE\SOFTWARE\Formpipe Software\Lasernet Developer 11Computer\HKEY_LOCAL_MACHINE\SOFTWARE\Formpipe Software\Lasernet Printer Service 11Computer\HKEY_LOCAL_MACHINE\SOFTWARE\Formpipe Software\Lasernet OCR 11Note
If the
Computer\HKEY_LOCAL_MACHINE\SOFTWARE\Formpipe Softwarekey is now empty, you can delete it.
8. Install Lasernet Core 11.1 or Later
Install Lasernet Core 11.1 or later according to the Lasernet Core 11 Installation and Setup Guide. However, you do not need to create a Lasernet Config database, because when you configure the new version of Lasernet Core 11 you will connect Lasernet Config to the existing Lasernet Config database.
9. Configure the New Version of Lasernet Core
Use your comprehensive configuration notes to configure the newly installed version of Lasernet Core 11:
Configure the Lasernet Config 11 service (including configuring it to connect to the existing Lasernet Config database).
Create and configure Lasernet Core environments.
Complete all other necessary aspects of Lasernet Core configuration.
10. Update Lasernet Core Workflows (Configurations)
After you start the newly installed version of Lasernet Core 11, your Lasernet Core workflows (configurations) will be present in the Lasernet Core administration tool. However, you must update the references that they contain to Lasernet Core environments, because you created new Lasernet Core environments after you installed the new version of Lasernet Core.
For each Lasernet Core configuration, follow these steps:
Start Lasernet Developer.
Load the configuration.
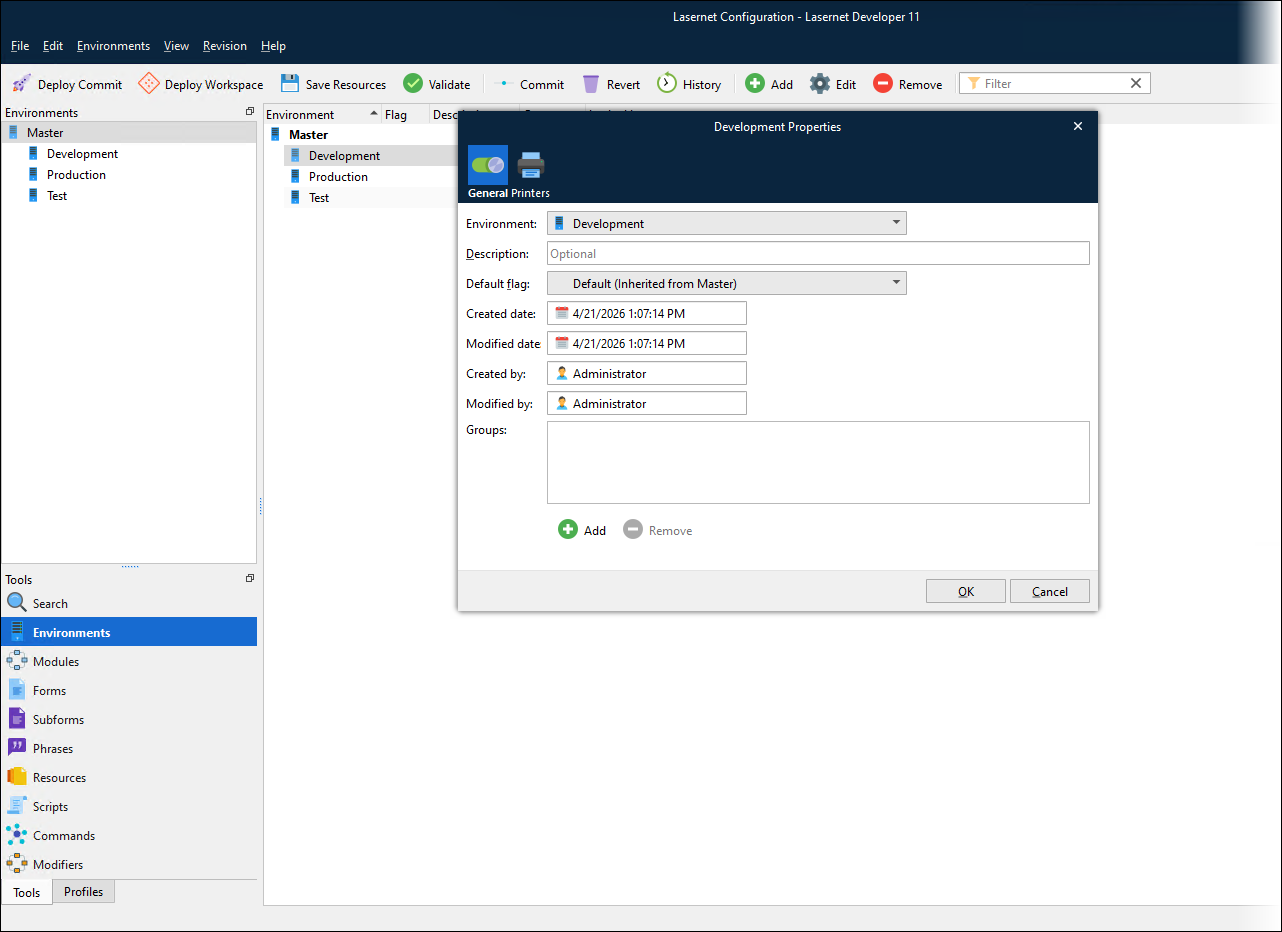
In the Tools pane, click Environments.
Double-click the first environment in the list. The environment’s Properties window opens.
In the Environment list, select the correct environment.
Click OK.
Repeat the steps above for the other listed environments.
Commit your changes to the configuration.
If necessary, deploy the updated configuration to environments.