
Applies to: Lasernet Core 11
You can specify “actions”, which affect the XML that the XML Transformer processes. You can also arrange actions into groups to make managing them easier.
Actions Reference
Create
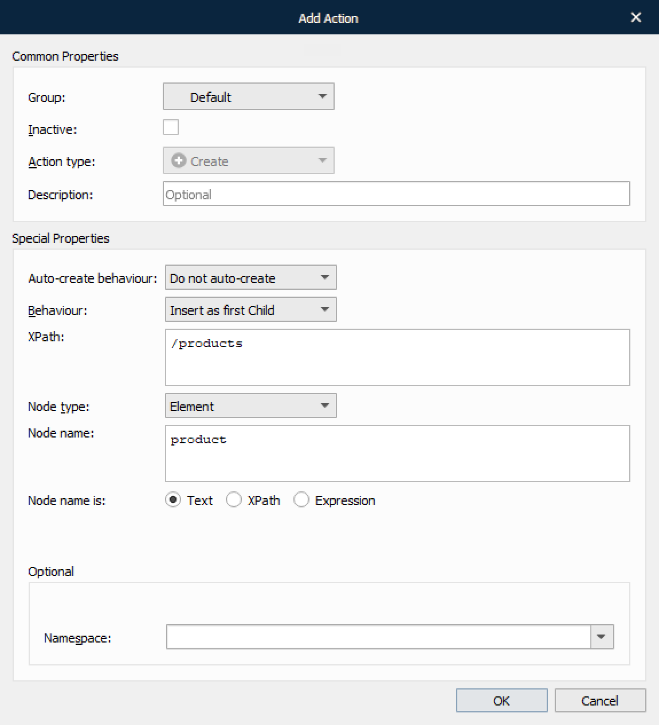
The create action is one of the simplest actions available. It takes an XPath and a given name and then creates a new node based on the type and behaviour chosen.
To apply the create action, follow the steps listed below:
On the developer toolbar, click the Create button.

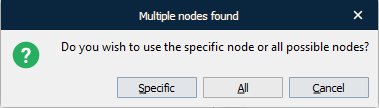
Once the cursor turns into a plus sign, click the node on which you want to base your new node. If more than one element of the same name is found, the following dialog appears. Make your choice by clicking the corresponding button.
With the Add Action dialog displayed, fill in the fields, as required, and click OK.
See the following table to learn more about the action properties:
Property | Description | |
1 | Auto-create behaviour | This setting can auto-create a new element displayed in XPath if not already present in XML document. The place of the new element insertion:
|
2 | Behaviour | Select a behaviour item to determine the place of the new node insertion:
|
3 | XPath | Displays the path expression to select a node or a node-set in the XML document. |
4 | Node type | Select a type for a new node:
If the type is set to Attribute, an additional property is added, (Node value) and must be defined as either Text, Xpath, Expression, or JobInfo. |
5 | Type a node name. | |
6 | Node name is | Specify the node name by selecting if it is Text, Xpath, Expression or JobInfo (XML only). |
7 | Namespace | Select the required namespace from the available ones or type your own namespace to define the namespace declaration. To create a non-default namespace, type a node name in the Node name text box in the following format: <prefix>:<node name>. |
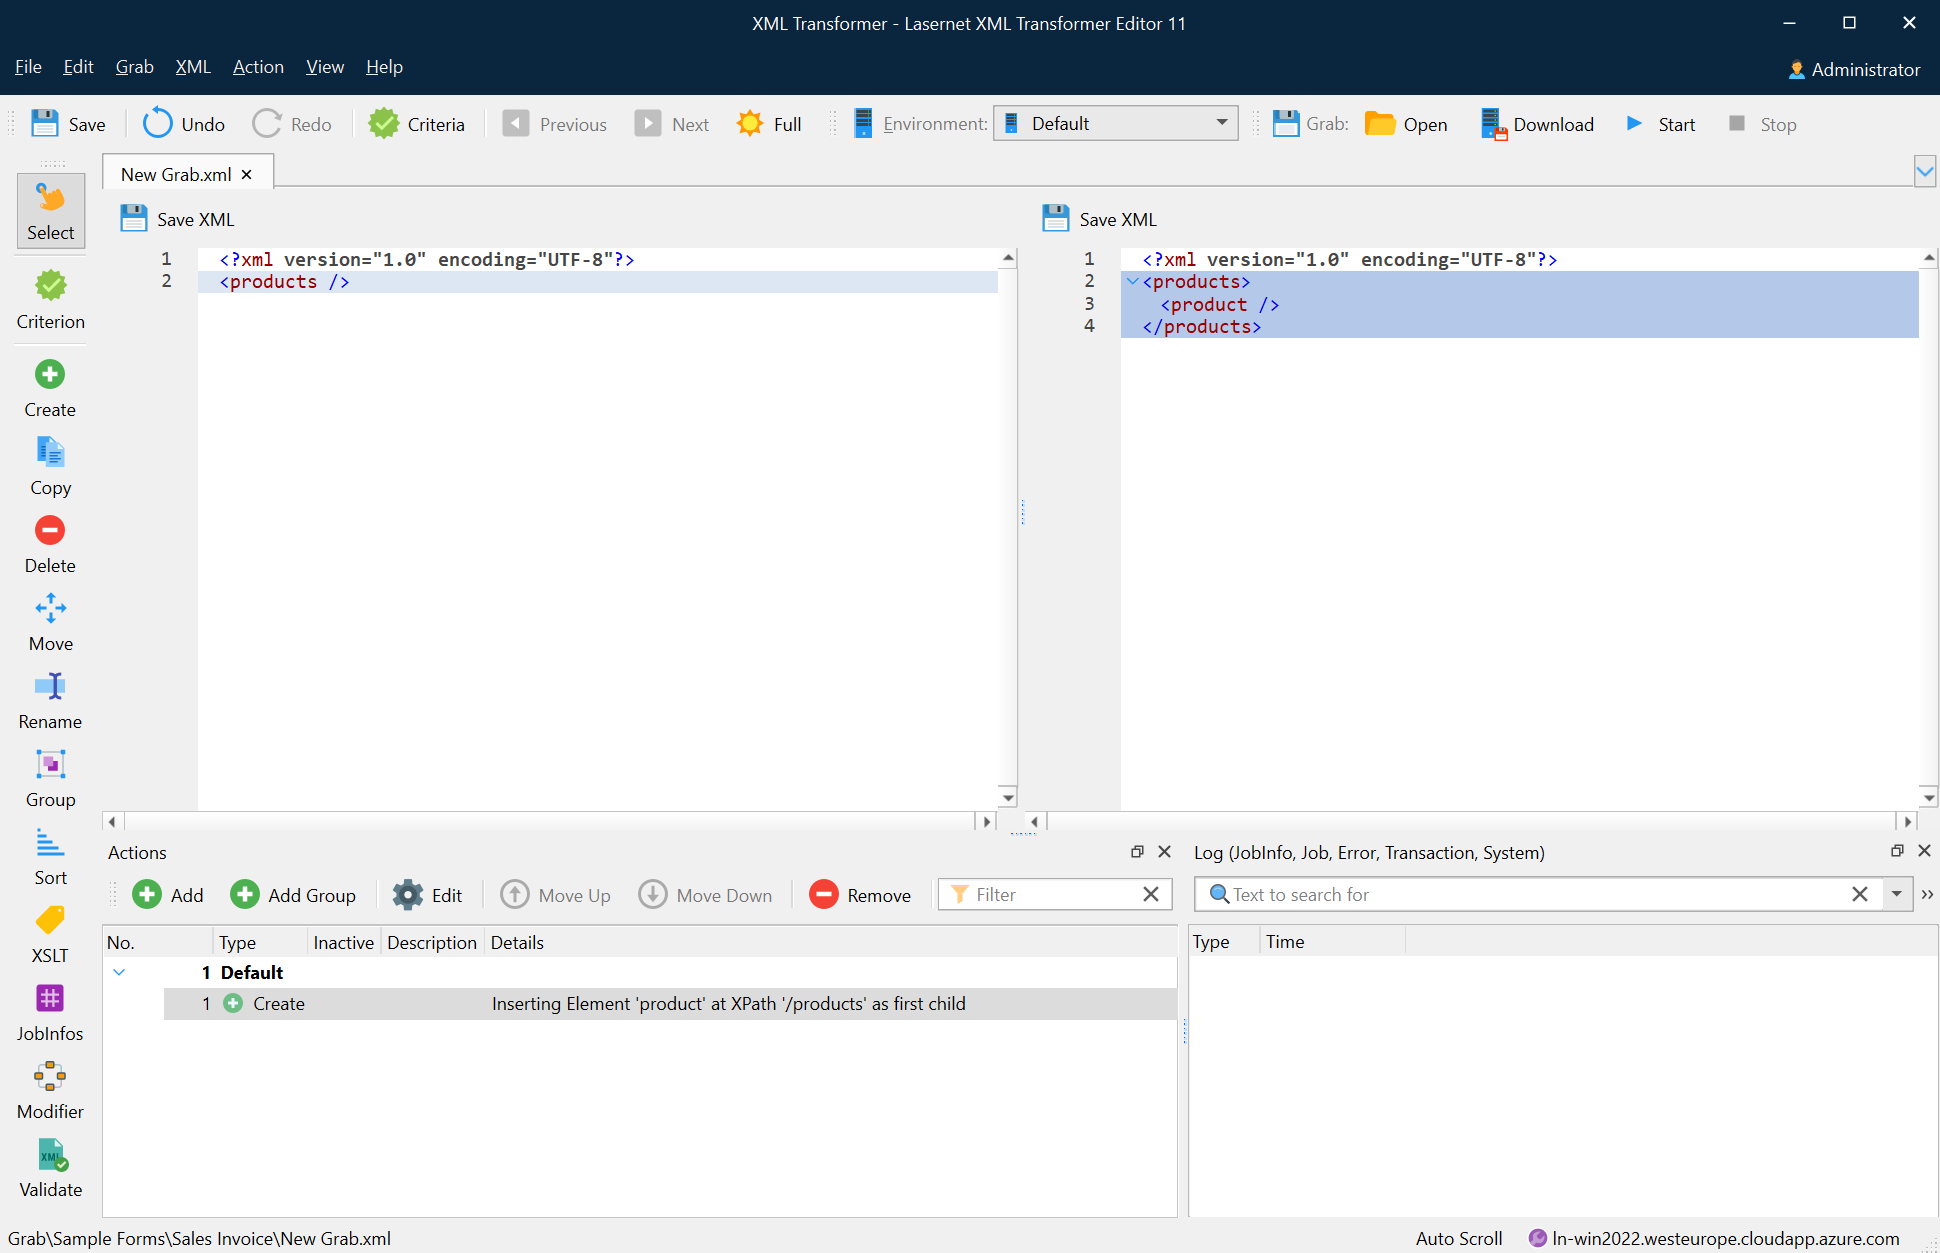
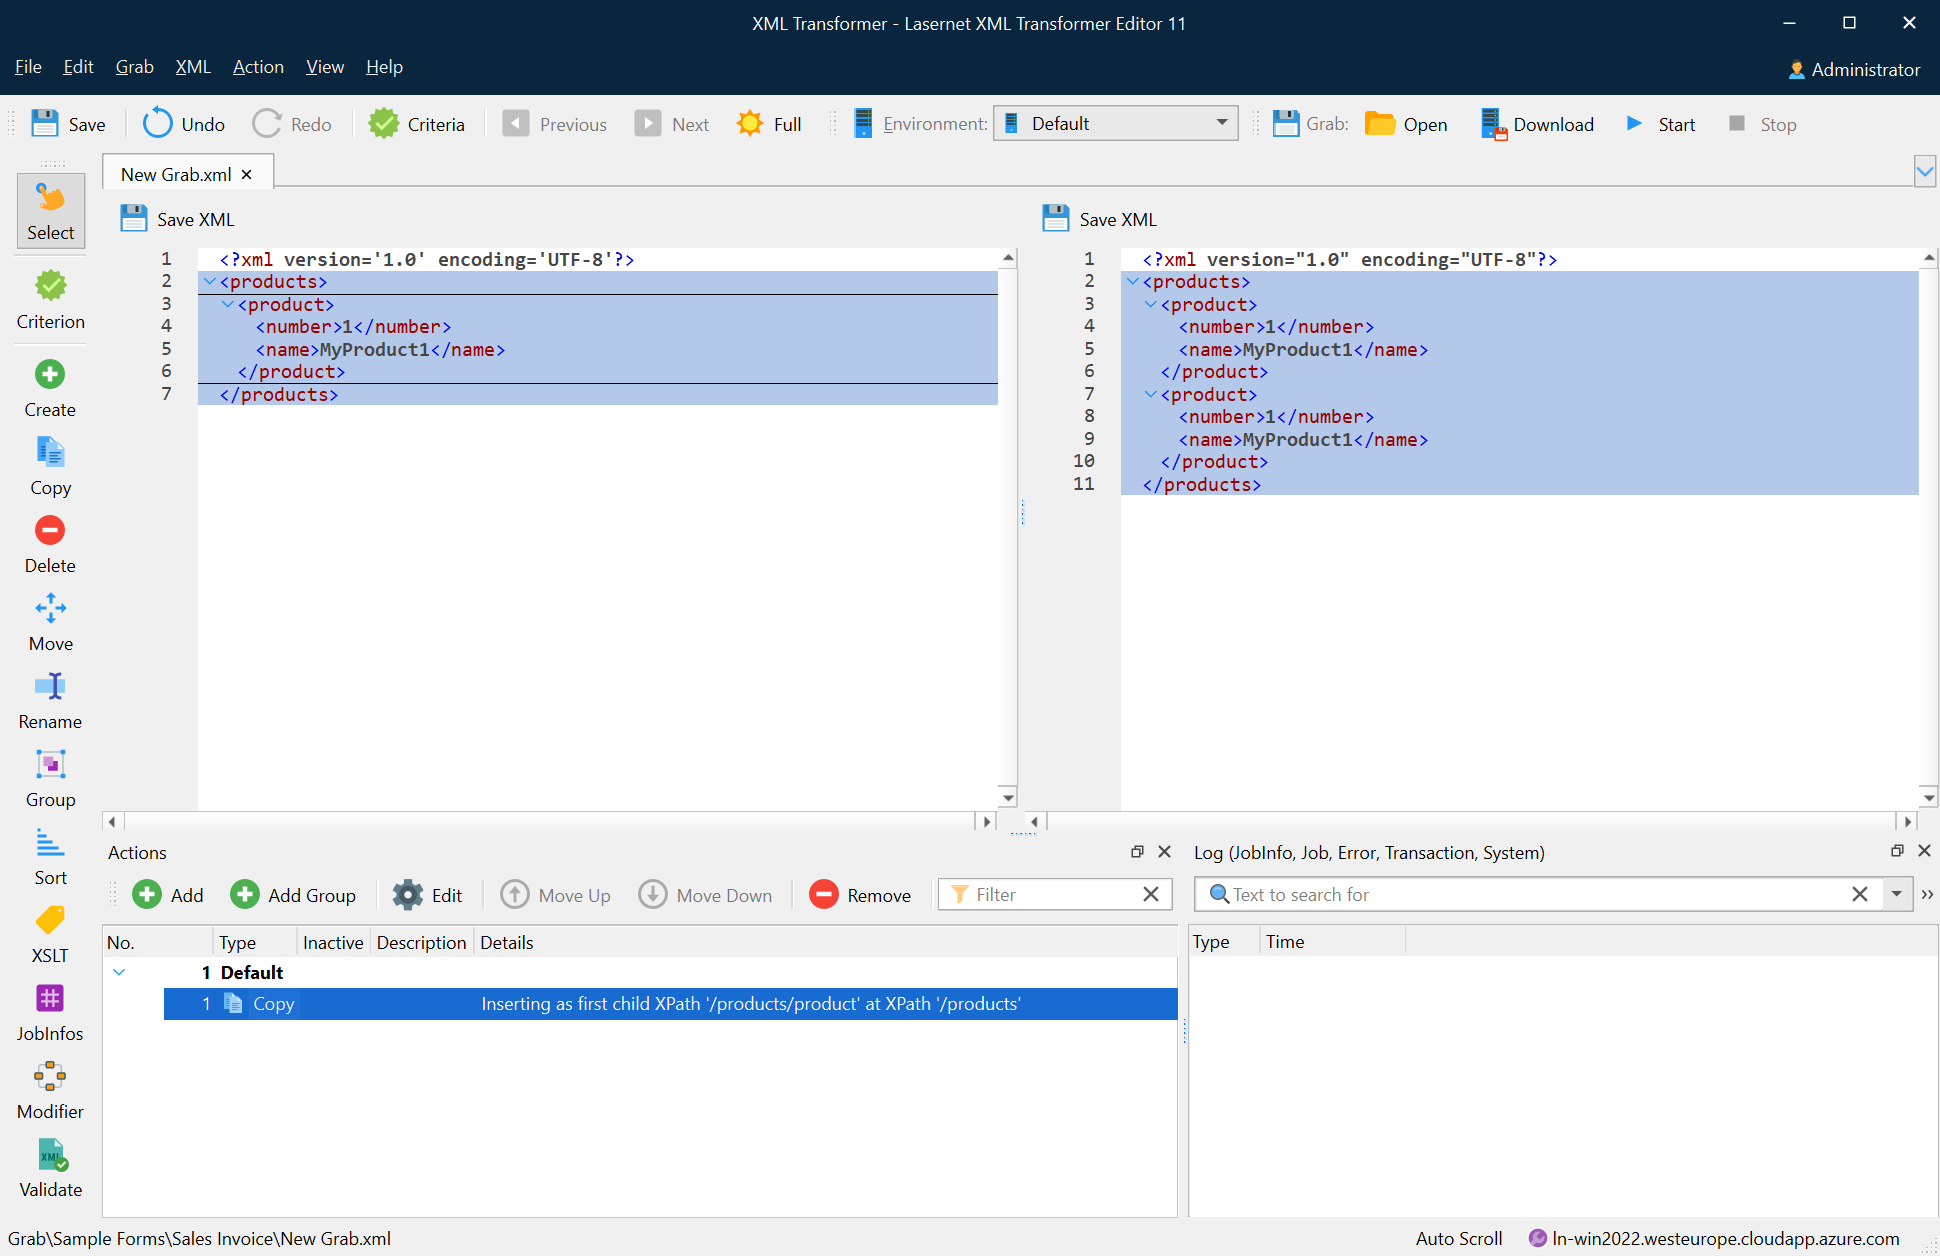
The following image shows the result of the create action: inserting the Product element to the /products/ XPath as the first child.
Copy
Due to the number of possible variations that could be encountered when using the copy action, a complex logic is used to ensure that valid XML actions are always observed. The table below shows all the combinations available using a source XPath, a target XPath, and a behaviour.
Source | Target | Insert as last sibling | Insert as first sibling | Insert as first child | Insert as last child | Insert before | Insert after | Replace |
Attribute | Attribute | + | + | + | ||||
Attribute | Element | + | + | + | + | + | + | |
Attribute | Text types* | + | + | + | + | + | ||
Element | Attribute | |||||||
Element | Element | + | + | + | + | + | + | + |
Element | Text types* | + | + | + | + | |||
Text types* | Attribute | + | ||||||
Text types* | Element | + | + | + | + | + | + | + |
Text types* | Text types* | + | + | + | + | + | + | + |
* Text types covers: text-nodes, comments, cdata, and entity references.
Attribute 🡪 Attribute
Behaviour | Strategy |
Insert as first sibling Insert as last sibling | Replaces the value of the target attribute with the value of the source attribute. The name of the attribute remains unchanged. |
Insert as first child Insert as last child Insert before Insert after | N/A |
Replace | Replaces the value of the target attribute with the value of the source attribute. The name of the attribute remains unchanged. |
Attribute 🡪 Element
Behaviour | Strategy |
Insert as first sibling Insert as last sibling Insert as first child Insert as last child Insert before Insert after | Adds the source attribute to the attributes of the target. |
Replace | N/A |
Attribute 🡪 Text types
Behaviour | Strategy |
Insert as first sibling Insert as last sibling | Adds a new node of the same type as the target node (text, comment, cdata, or entity ref.) as the first child of the parent of the target node. Inserts the value of the source attribute as the value of the new node. |
Insert as first child Insert as last child | N/A |
Insert before | Inserts a new node of the same type as the target node (text, comment, cdata, or entity ref.) just before the target node. Inserts the value of the source attribute as the value of the new node. |
Insert after | Inserts a new node of the same type as the target node (text, comment, cdata, or entity ref.) just after the target node. Inserts the value of the source attribute as the value of the new node. |
Replace | Replaces the value of the target node with the value of the source attribute. |
Element 🡪 Attribute
An element may not be copied to an attribute.
Element 🡪 Element
All copy methods for an element are recursive. This means that whenever a copy action is performed on an element, the descendants (the contents) of that element are always copied.
Behaviour | Strategy |
Insert as first sibling | Adds the source element as the first child of the parent of the target element. |
Insert as last sibling | Adds the source element as the last child of the parent of the target element. |
Insert as first child | Adds the source element as the first child of the target element. |
Insert as last child | Adds the source element as the last child of the target element. |
Insert before | Inserts the source element just before the target element. |
Insert after | Inserts the source element just after the target element. |
Replace | Replaces the target element with the source element. |
Element 🡪 Text types
Behaviour | Strategy |
Insert as first sibling | Adds the source element as the first child of the parent of the target node. |
Append as sibling | Adds the source element as the last child of the parent of the target node. |
Insert as first child Insert as last child | N/A |
Insert before | Inserts the source element just before the target node. |
Insert after | Inserts the source element just after the target node. |
Replace | N/A |
Text types 🡪 Attribute
Behaviour | Strategy |
Insert as first sibling Insert as last sibling Insert as first child Insert as last child Insert before Insert after | N/A |
Replace | Replaces the value of the target attribute with the text value of the source node. |
Text types 🡪 Element
Behaviour | Strategy |
Insert as first sibling | Adds the source node as the first child of the parent of the target element. |
Insert as last sibling | Adds the source node as the last child of the parent of the target element. |
Insert as first child | Adds the source node as the first child of the target element. |
Insert as last child | Adds the source node as the last child of the target element. |
Insert before | Inserts the source node just before the target element. |
Insert after | Inserts the source node just after the target element. |
Replace | Replaces the target element with the source node following the steps:
|
Text types 🡪 Text types
Behaviour | Strategy |
Insert as first sibling | Adds the source node as the first child of the parent of the target node. |
Insert as last sibling | Adds the source node as the last child of the parent of the target node. |
Insert as first child Insert as last child | N/A |
Insert before | Inserts the source node just before the target node. |
Insert after | Inserts the source node just after the target node. |
Replace | Replaces the value of the target node with the value of the source node. |
Steps
To apply the copy action, proceed through the steps listed below:
On the developer toolbar, click the Copy button.

Once the cursor turns into a plus sign, click the node you want to copy. Then move the rectangle to the place where you want to paste the node.
With the Add Action dialog displayed, fill in the fields, as required, and then click OK.
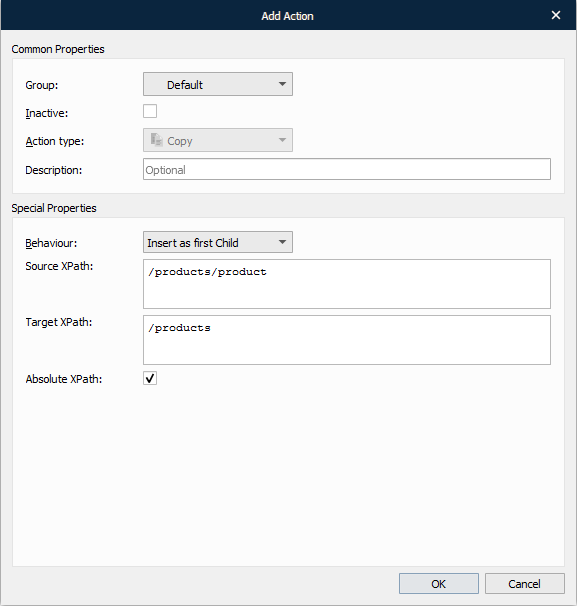
See the table below to learn more about the action properties:
Property | Description | |
1 | Behaviour | Select the behaviour of the item to determine its place:
|
2 | Source XPath | Shows the source XPath. |
3 | Target XPath | Shows the target XPath. |
4 | Absolute XPath | Select the check box to indicate the full path in the Target XPath field. If you clear the check box, you must type a relative path in the Target XPath field. |
The following image depicts the result of the copy action.
In addition, you can right-click the node you want to copy and then click Copy node on the context menu that appears. Afterwards, right-click the node where you want to paste it and then select the Paste node in the context menu. Once you paste the node, the Copy action is added to the Actions list.
Delete
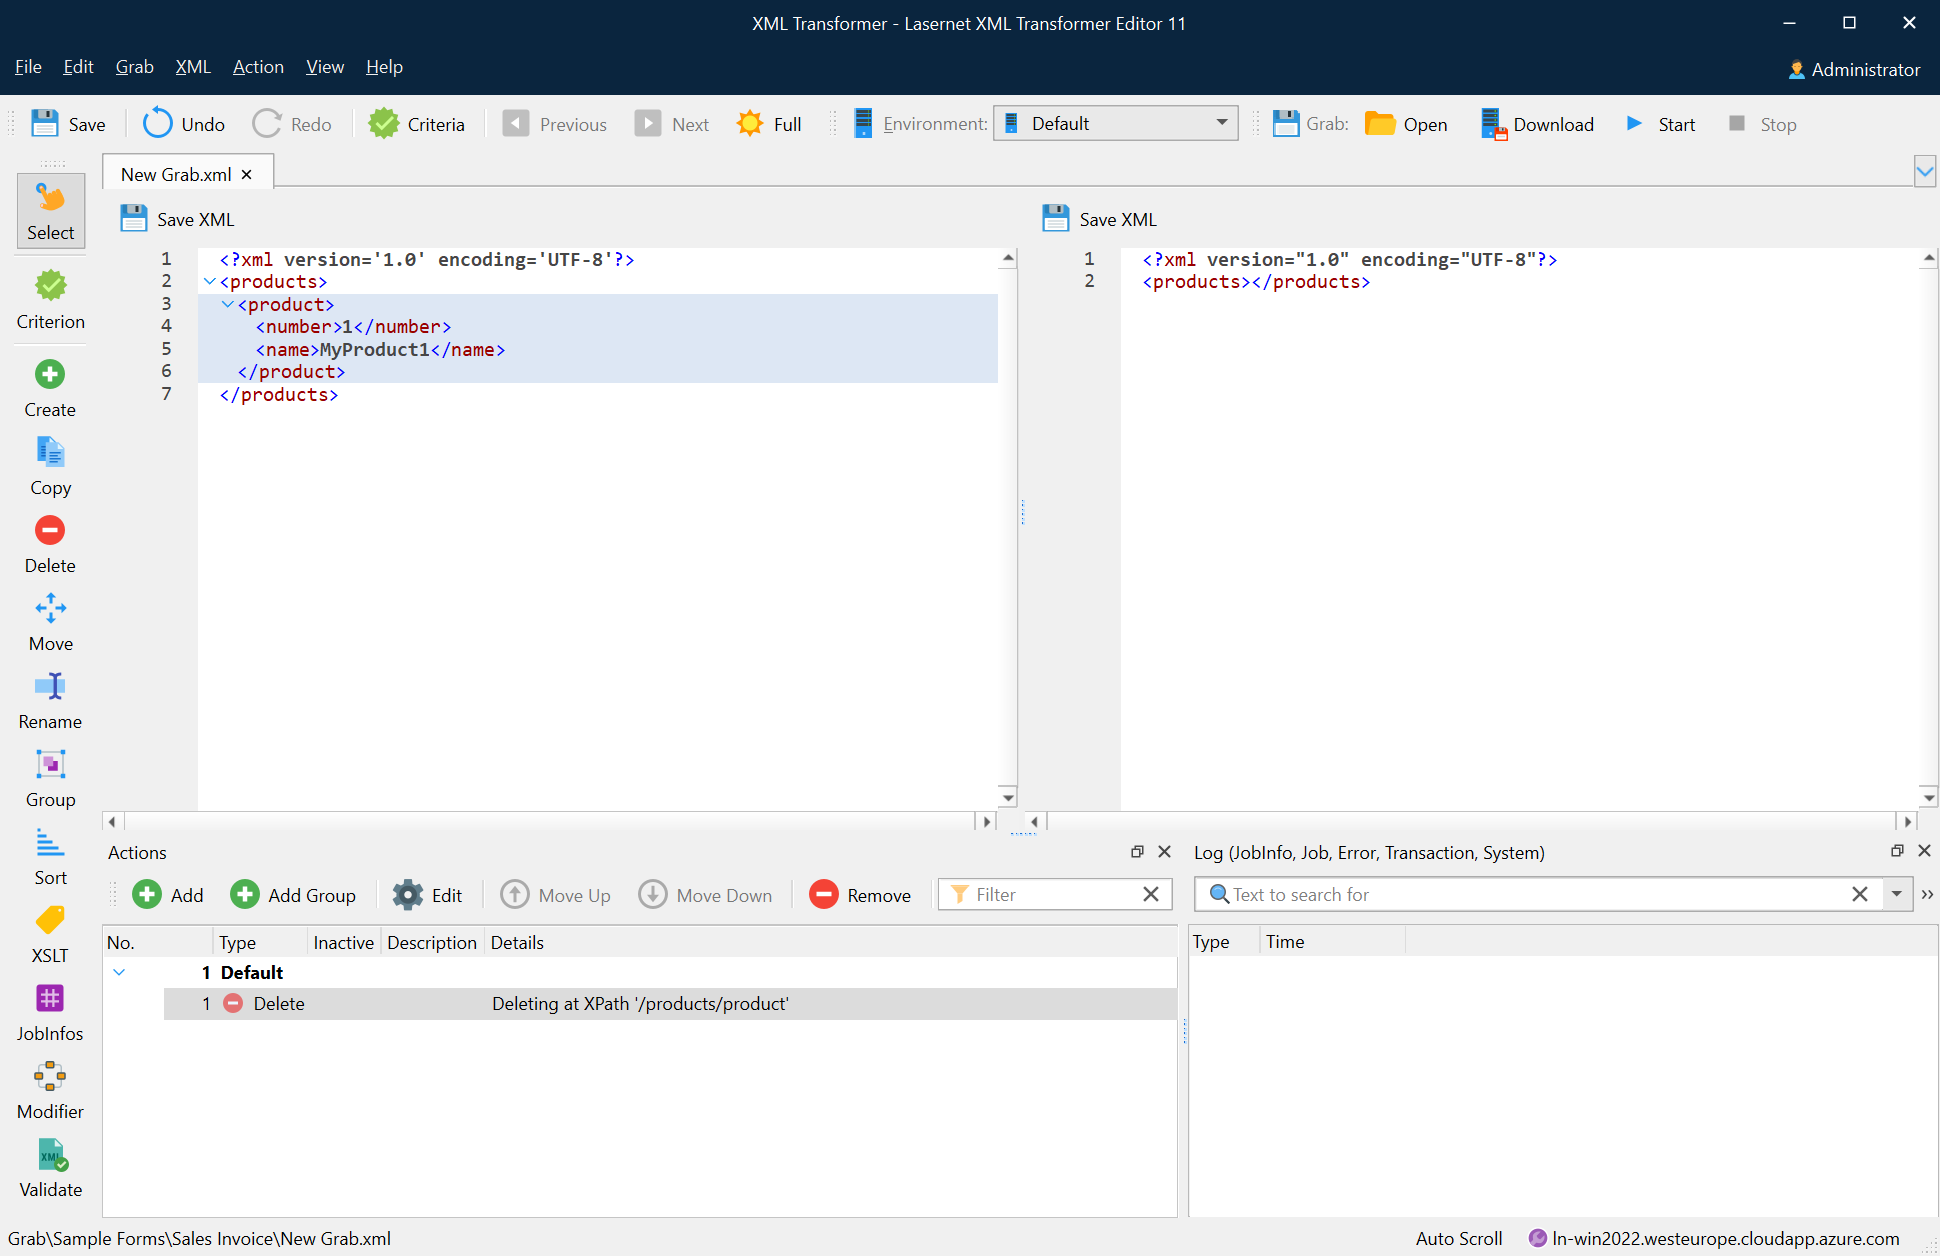
The delete action takes an XPath which returns either a node or a node list to be deleted.
To apply the delete action, proceed through the steps listed below:
On the developer toolbar, click the Delete button.

Once the cursor turns into a plus sign, click the node you want to delete.
The following image depicts the result of the delete action.
Move
The move action is a combination of a copy action combined with a delete action on the source XPath.
To execute a move action, follow the steps listed below:
On the developer toolbar, click the Move button.

Once the cursor turns into a plus sign, click the node you want to move. Then move the rectangle to where you want to paste it.
With the Add Action dialog displayed, fill in the fields, as required, and then click OK.
The following image depicts the result of the move action.
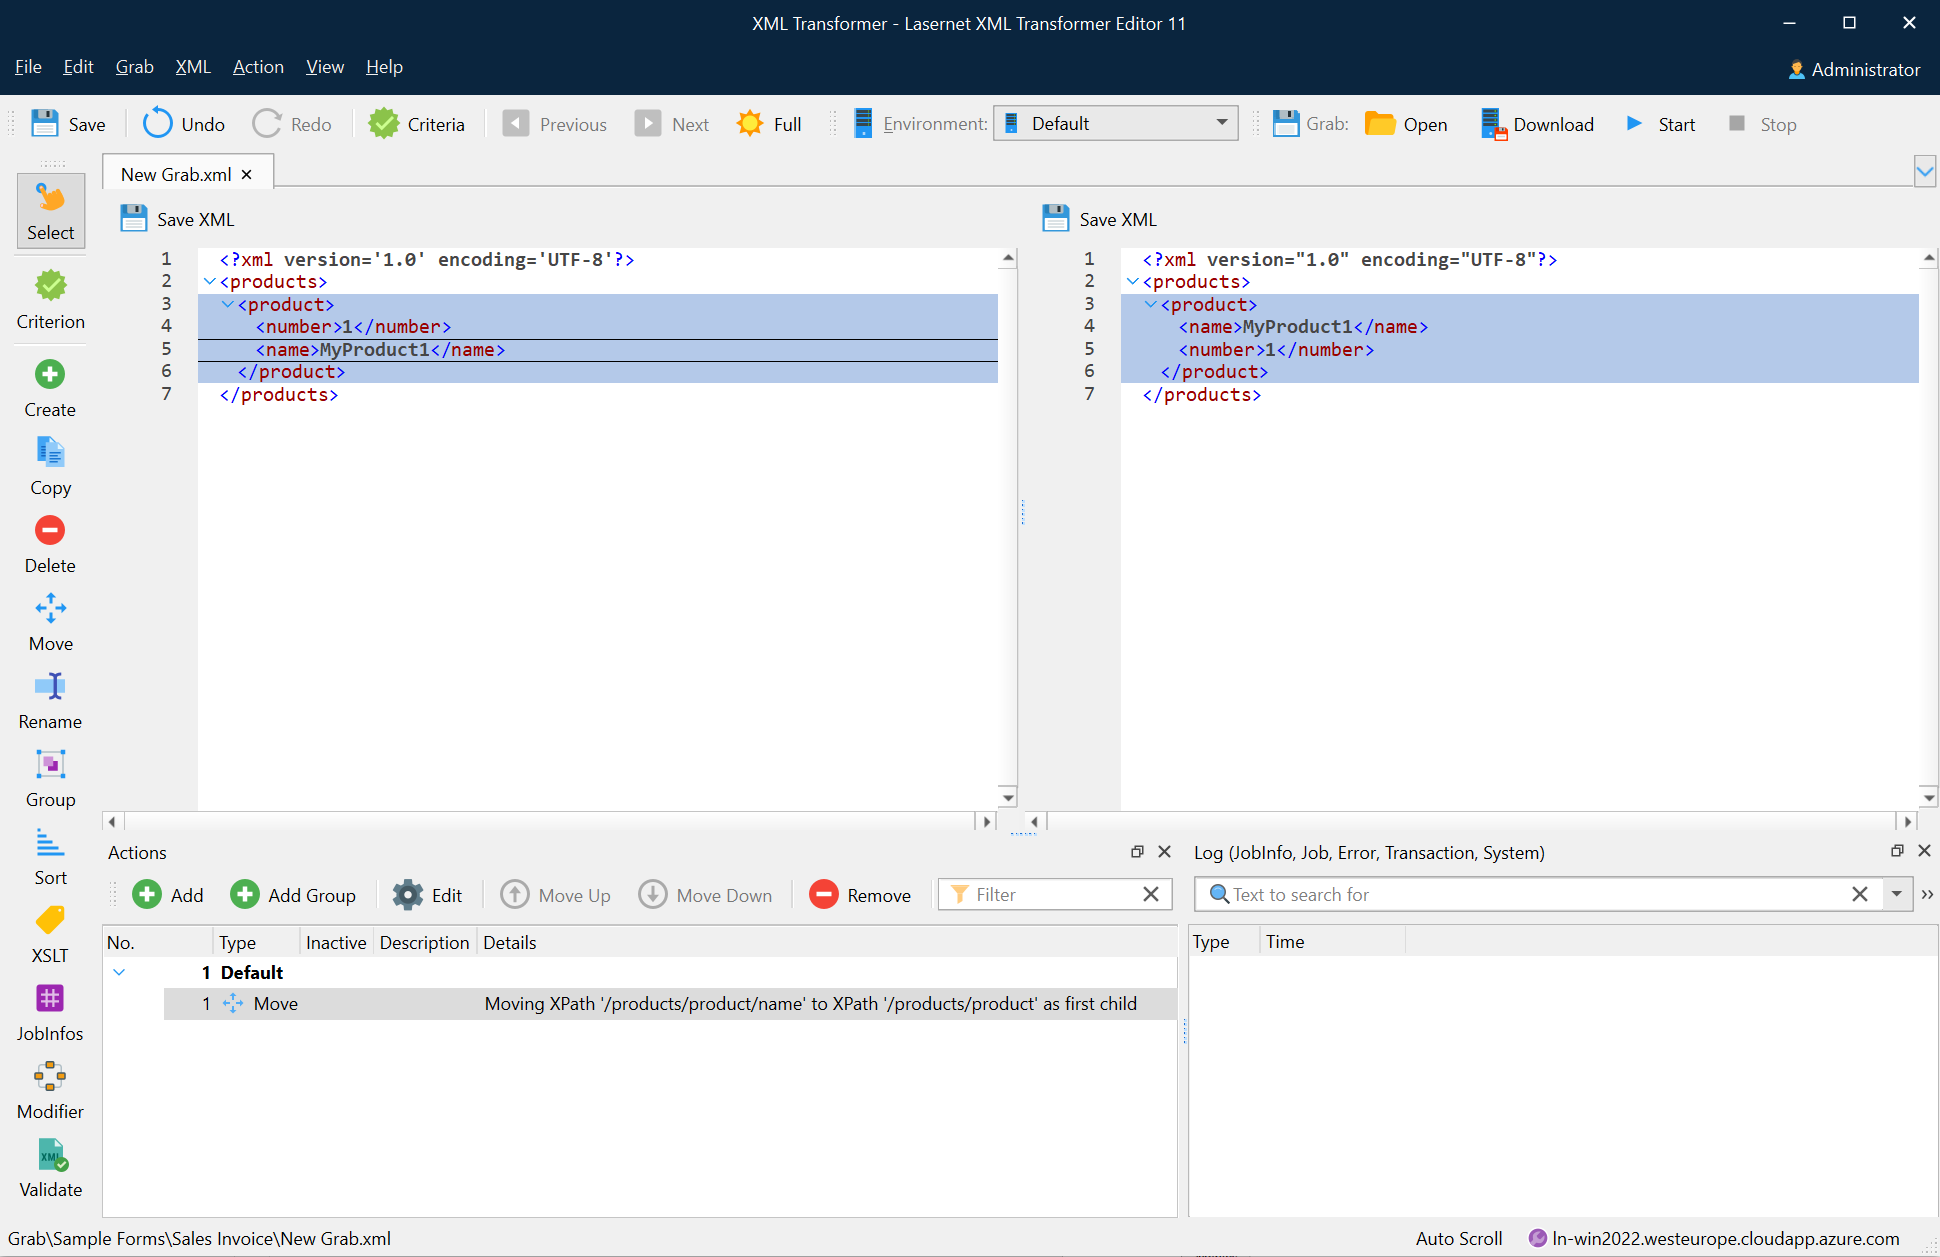
In addition, a new Move action is added to the Actions list.
You can also move a node easily by using the right-click context menu. Right-click the node you want to cut and select Cut node, then right-click the node that you want to paste and select Paste node.
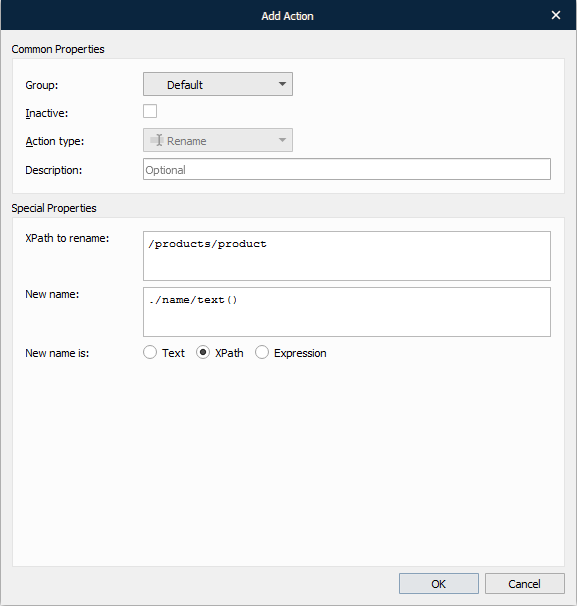
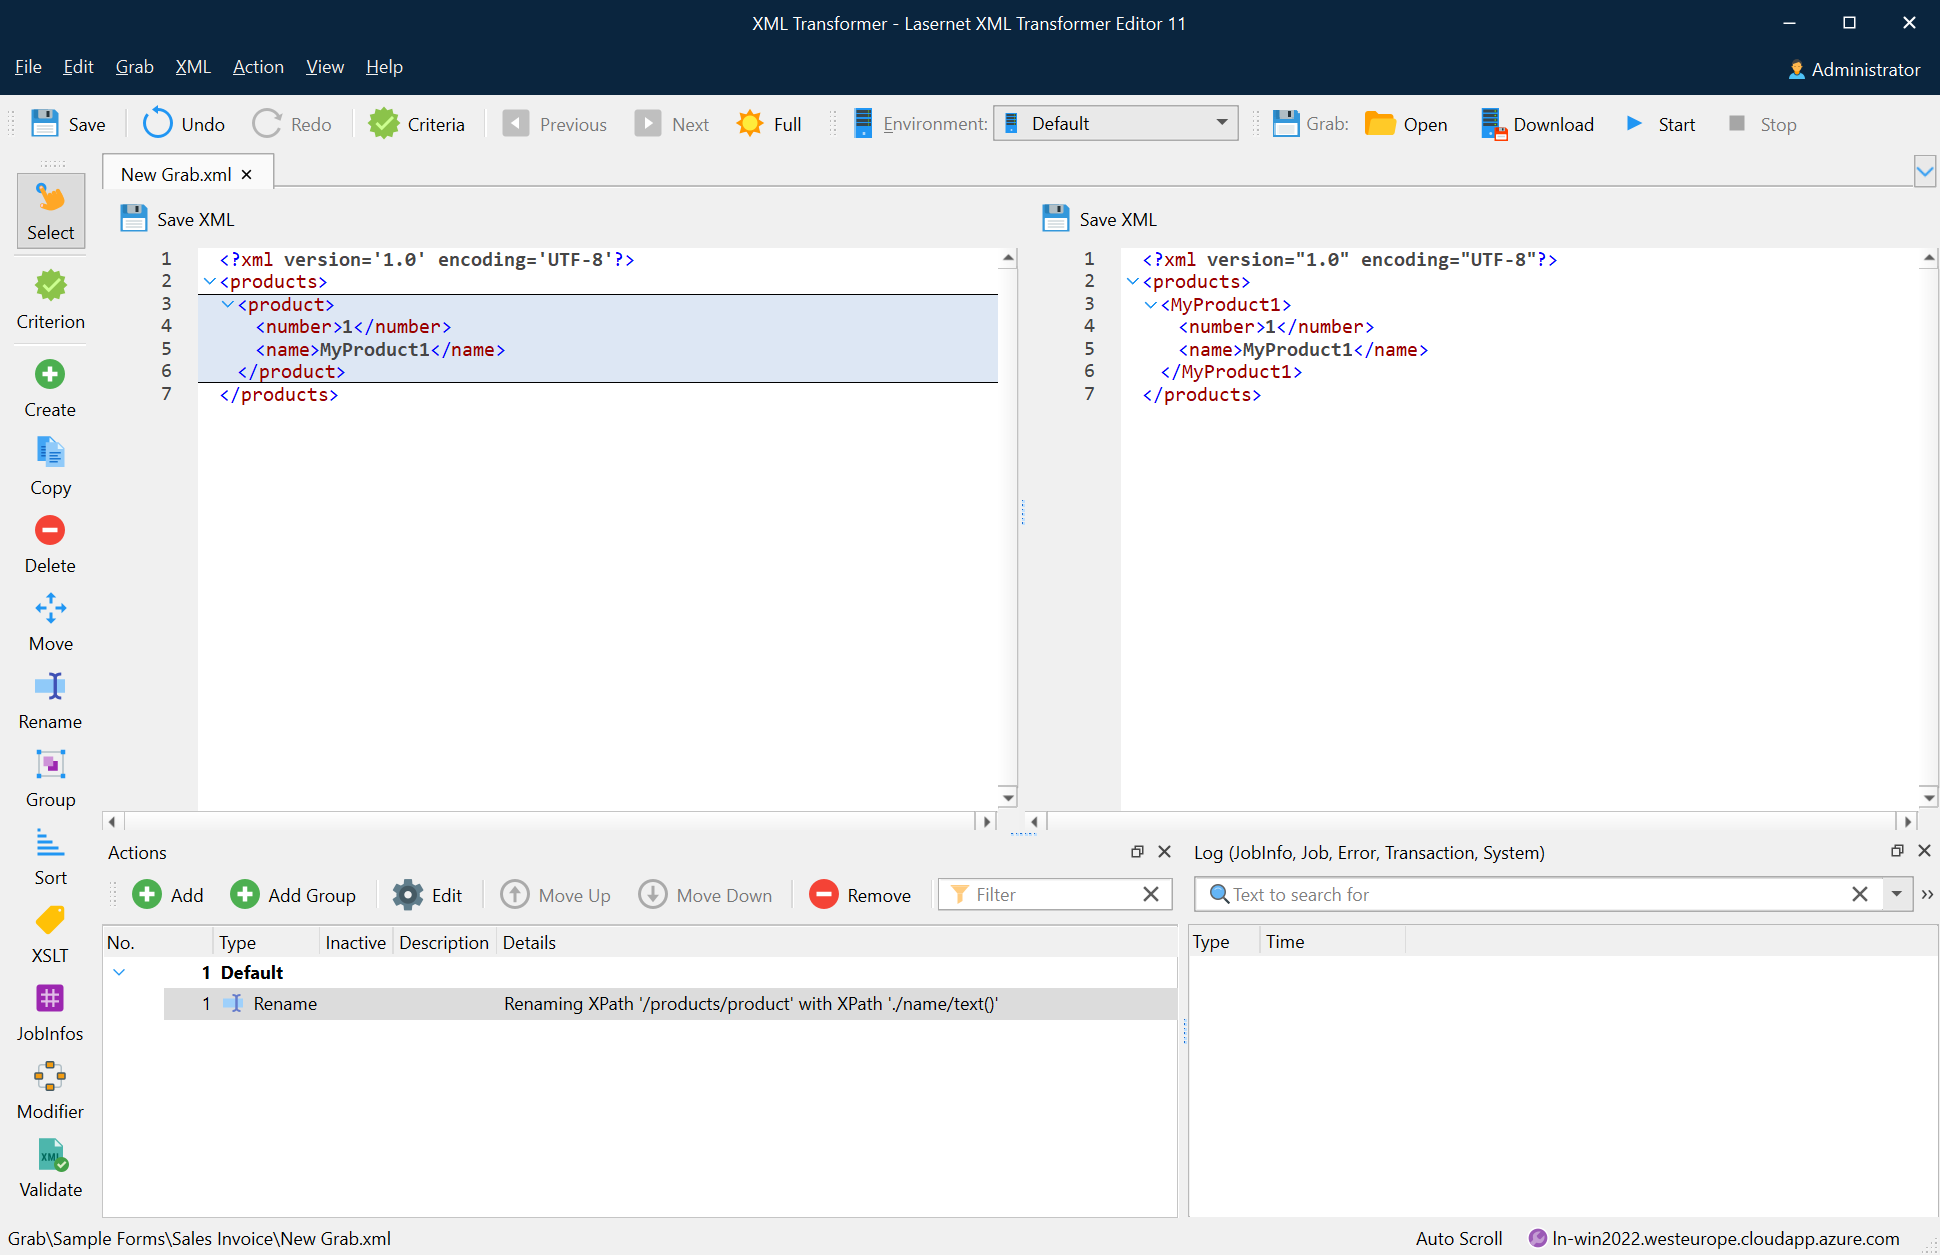
Rename
The rename action takes an XPath and a node name as parameters. The node or node-set returned by the XPath expression is then renamed to the value you specify.
To apply the rename action, follow the steps listed below:
On the developer toolbar, click the Rename button.

Once the cursor turns into a plus sign, click the node you want to rename.
With the Add Action dialog displayed, type a new name in the corresponding field and then click OK.
The following image depicts the result of the rename action.
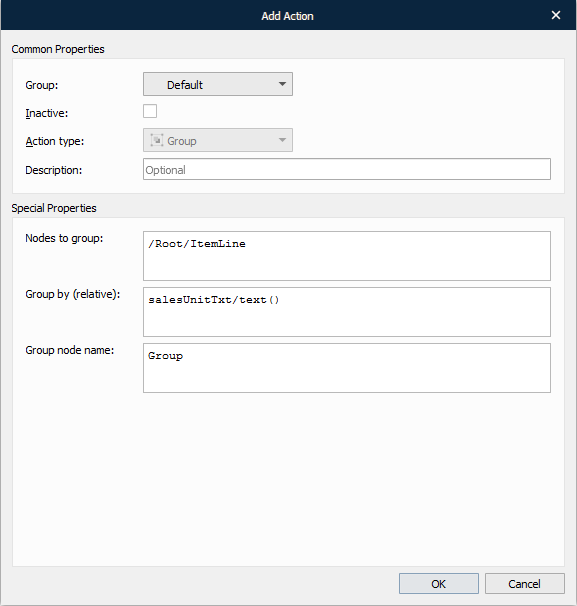
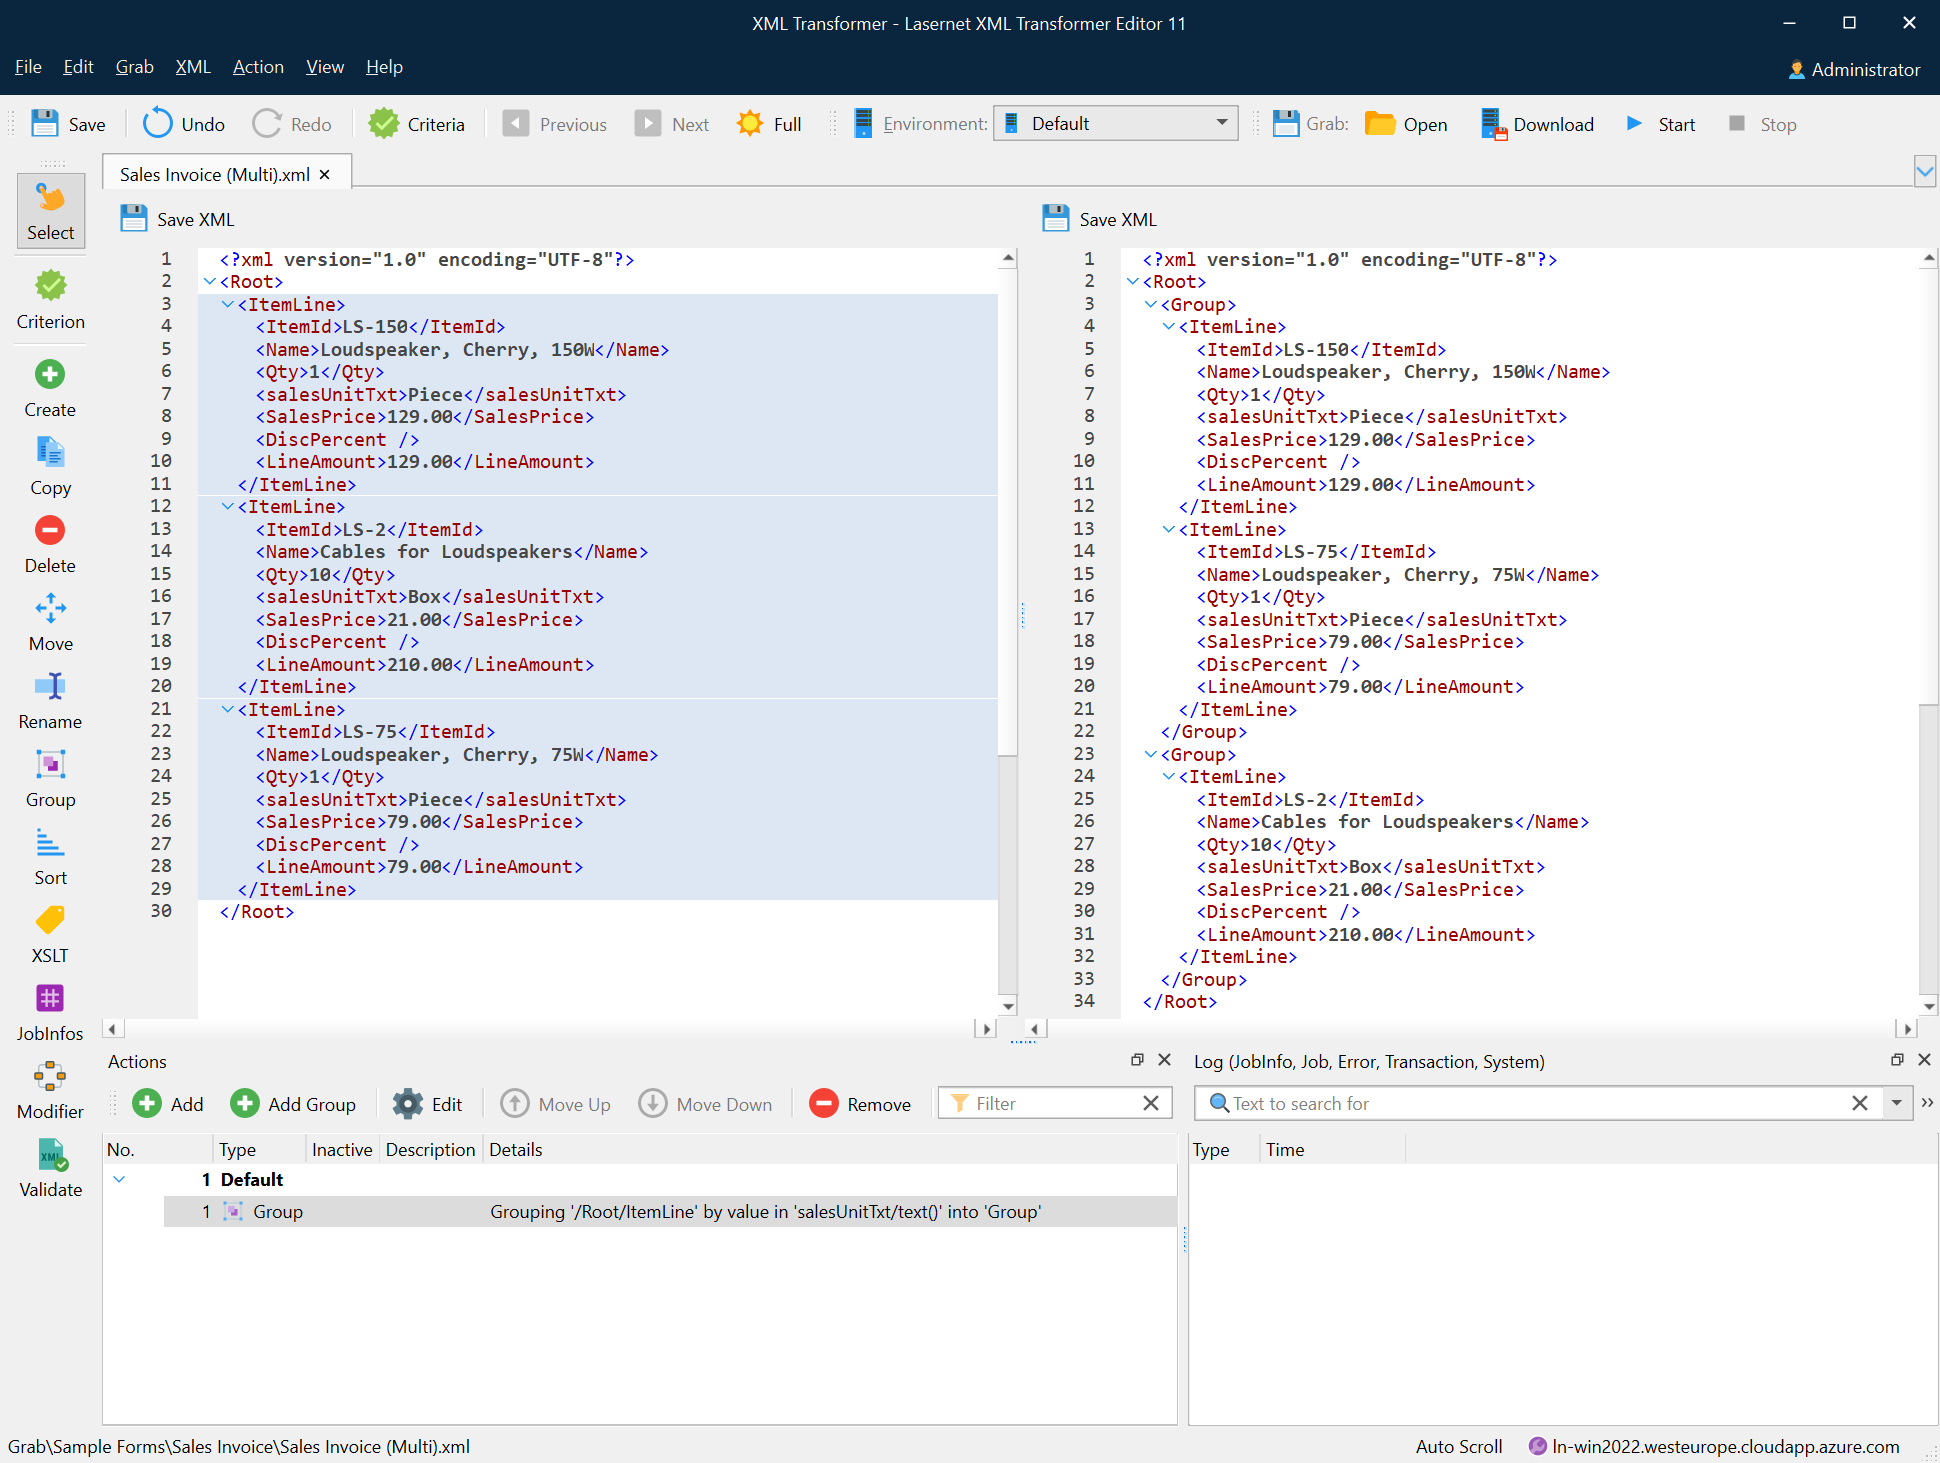
Group
The group action is used for creating new groups in an XML structure according to the parameters you specify. This is convenient if groups are required to create complex calculations based on the unstructured XML data.
To apply the group action, follow the steps listed below:
On the developer toolbar, click the Group button.

Once the cursor turns into a plus sign, click the node you want to group.
Next, click a node value by which you want to group the specified node(s).
With the Add Action dialog displayed, specify a name for the new node group. Once you are done, click OK.
The following image depicts the result of the group action.
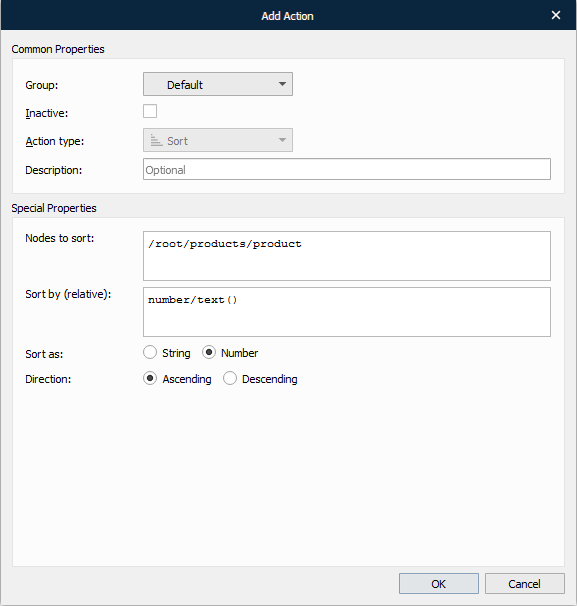
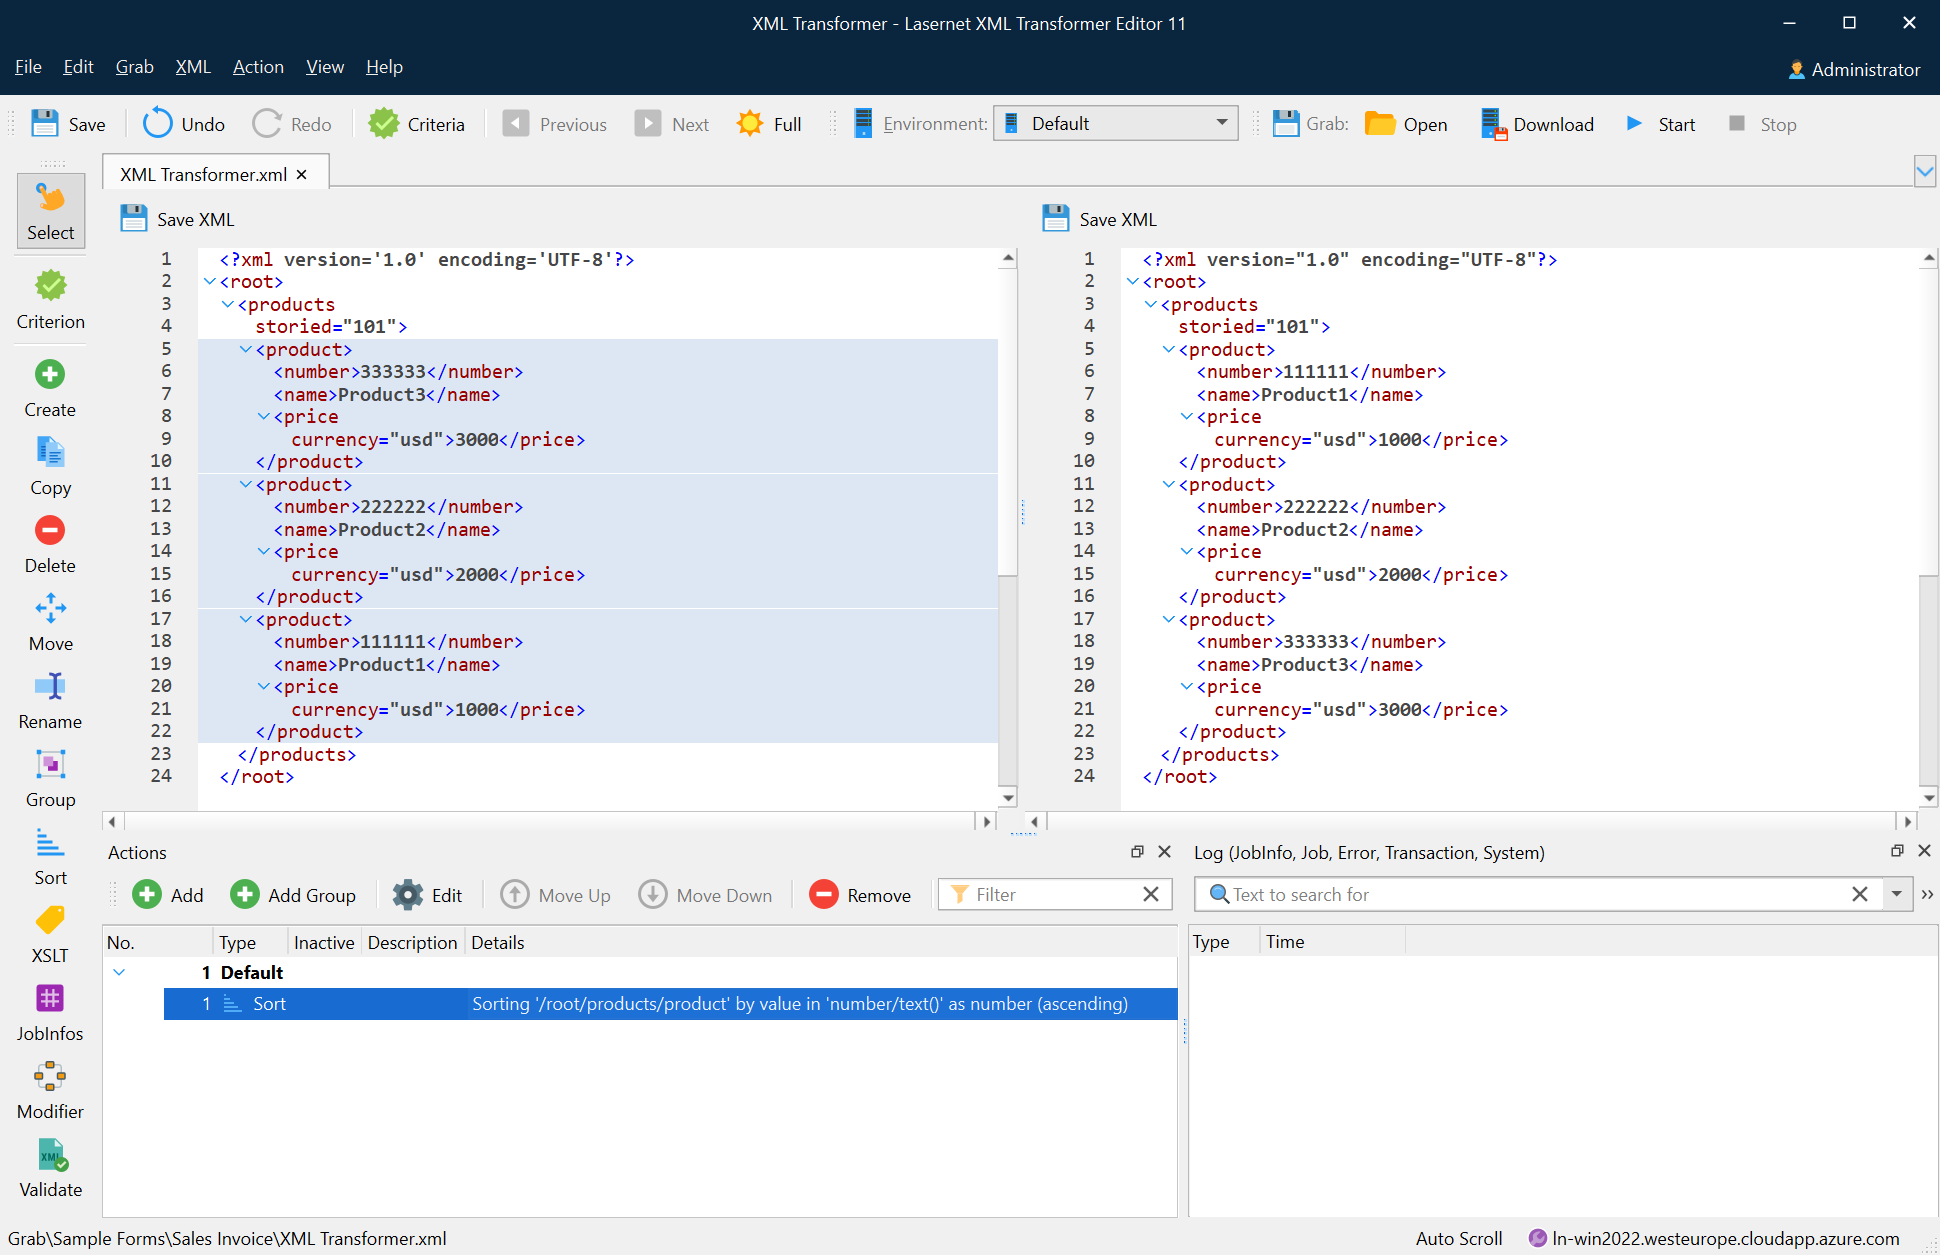
Sort
The sort action is used for sorting nodes in the node list according to the parameters you specify.
To apply the sort action, follow the steps listed below:
On the developer toolbar, click the Sort button.

Once the cursor turns into a plus sign, click the node you want to sort.
Next, click a node value to sort by.
With the Add Action dialog displayed, select the type to sort (as String or Number), as well as the direction (Ascending or Descending). Once you are done, click OK.
The following image depicts the result of the sort action.
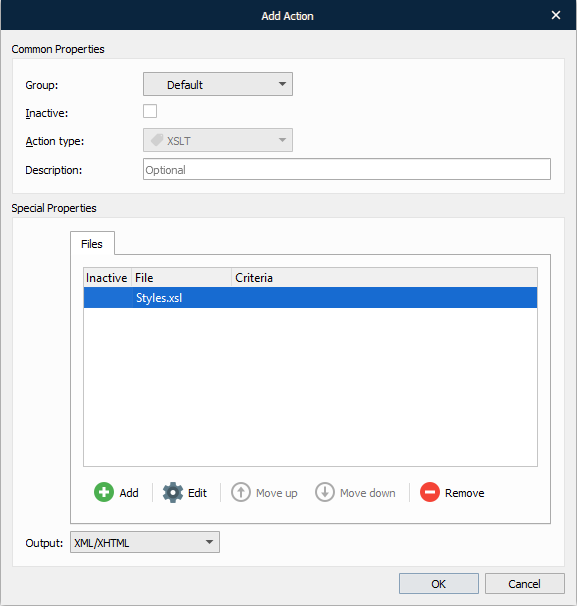
XSLT
Using the XSLT action type, you can create advanced transformations. The XSLT action applies an XSLT file. The root node of an XML document normally undergoes the XSL transformation, but different behaviour can be defined in the XSL itself.
To apply the XSLT action, follow the steps listed below:
On the developer toolbar, click the XSLT button.

With the Add Action dialog displayed, click the Add button to add an XSLT file for transforming the XML input file.

With the File dialog box displayed, browse the location of the XSLT document you want to add.
Use the Criteria tab to add JobInfos and specify criteria, if required. JobInfo criteria provide the user with additional methods for recognizing input data files.
Once you are done, click the OK button.
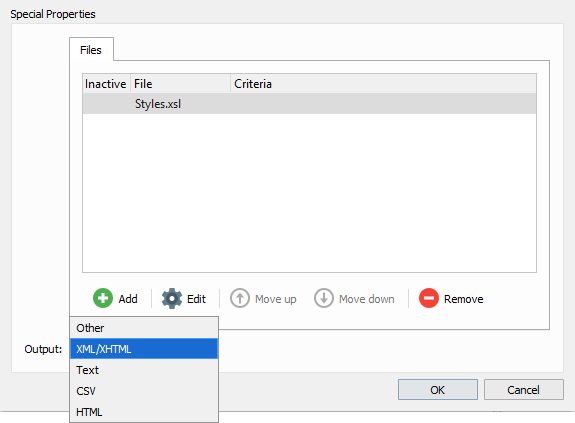
Output
You can create a wide range of output formats via XSLT. Select Other if your output format is not available in the list or XML/XHTML (default), Text, CSV or HTML. The selected output format has no influence on the final output, the application only prevents you from adding/running unsupported actions after XSLT is inserted/executed. Only the XML/XHTML formats are able to run additional actions after the stylesheet is processed.
Create JobInfos
The create JobInfos action allows to create your own JobInfos, i.e. variables.
To create a JobInfo, proceed through the steps listed below:
On the developer toolbar, click the JobInfos button.

Once the cursor turns into a plus sign, click the node for which you want to create a JobInfo.
With the Add Action dialog displayed, fill in the field, as required, and click OK.
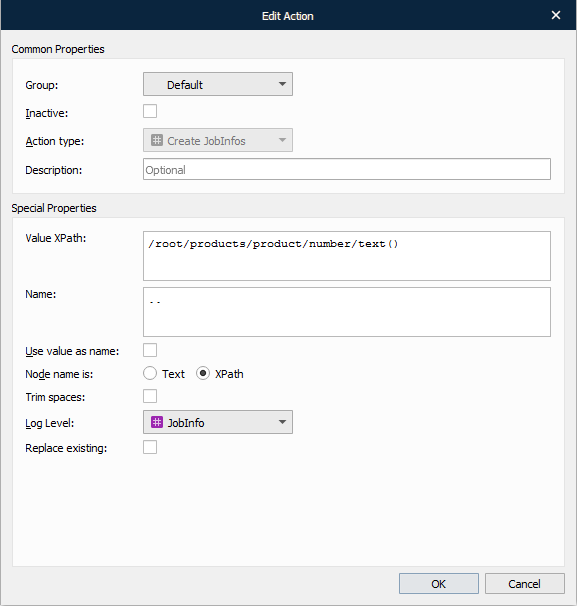
The table below provides a brief description of the action properties:
Property | Description | |
1 | Value XPath | The XPath value specifies which nodes contain the values for JobInfos. |
2 | Name | Specify a JobInfo name. |
3 | Use value as name | Select the check box to apply the Value XPath as a JobInfo name. |
4 | Replace existing | Select the check box to replace any other JobInfo with the same name. Some JobInfos can contain a list of several values for example, an email distribution list. |
5 | Node name is | Text – select the radio button to interpret the value indicated in the Name field as text. XPath – select the radio button to interpret the value indicated in the Name field as an XPath. |
6 | Log level | To extract the JobInfos from the document and create them on the current job, you need to specify a category under which the events related to the JobInfo are logged. JobInfo The events related to the JobInfo are logged under the JobInfo category. Debug The events related to the JobInfo are logged under the Debug category. NoLog The events related to the JobInfo are not logged. |
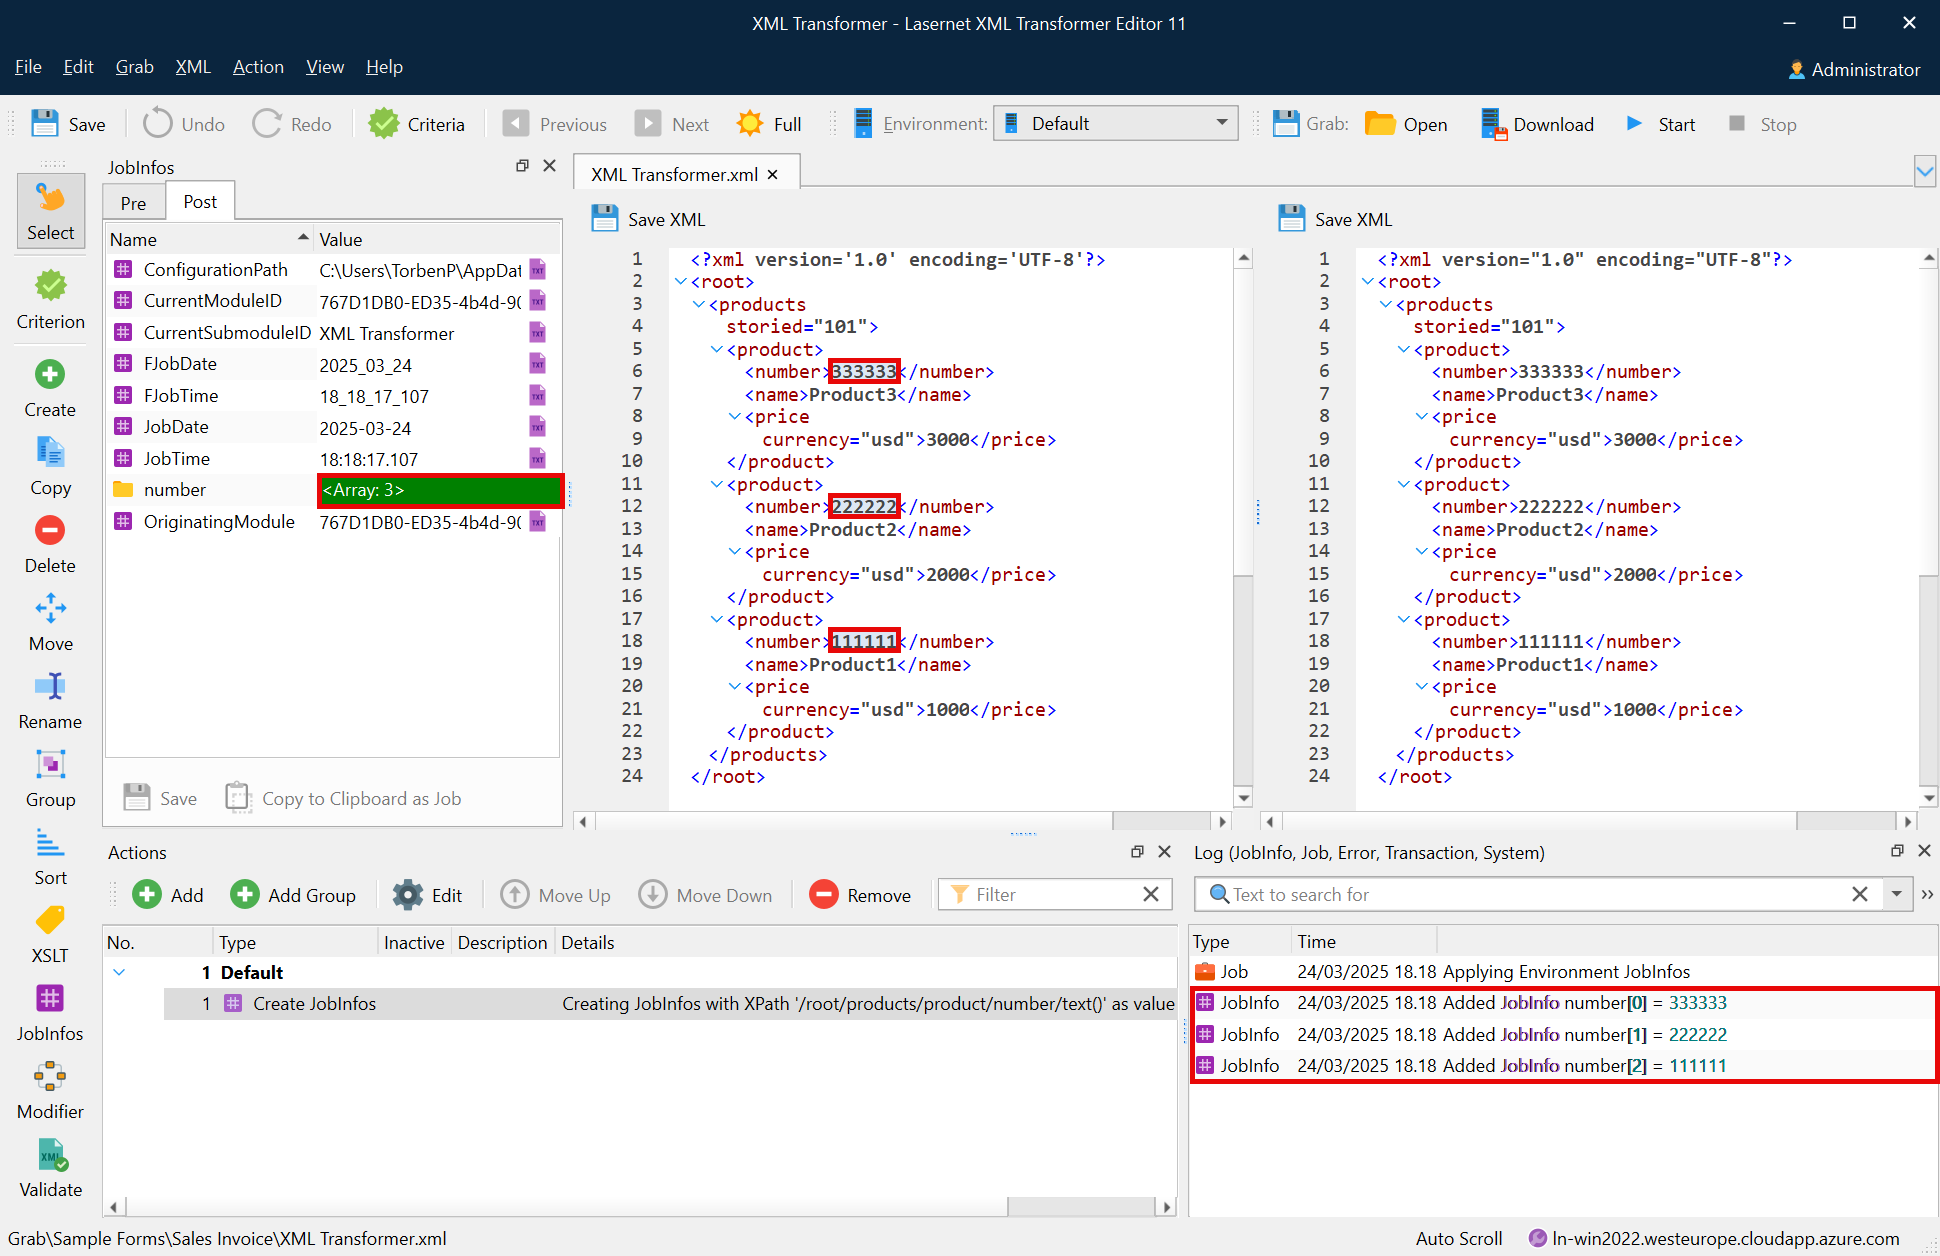
Properties defined in the Add Action dialog, shown above, take all underlying text-nodes in the JobInfos element, regardless of the position within the element. These are values of the JobInfos. The XPath name is relative to the current XPath value. Since the element contains all the text-nodes and the Use value as name check box is cleared, the parent (specified as ‘..’) takes the name of the element.
The following image shows the list of created JobInfos.
Validate
XML validation is a way to verify that data conforms to the associated schema prior to its delivery to another system. The XML Schema describes a valid structure for the XML document.
To apply the validate action, follow the steps listed below:
On the developer toolbar, click the Validate button.

With the Add Action dialog displayed, you can clear any Active checkbox(es) next to schema bundle(s) that you do not want to use during validation.
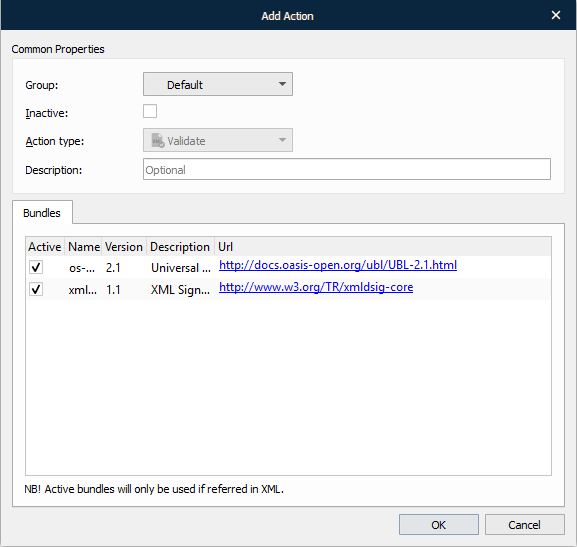
Once you are done, click the OK button.
For more details about validation, see XML Validator.
Groups
You can create groups within which you can arrange the actions that you have created. The tool can ease manipulating actions moved to a definite group by applying the required action to all the actions available under the group at a time. For example, you can toggle inactive all the actions available in a definite group by making this group inactive.
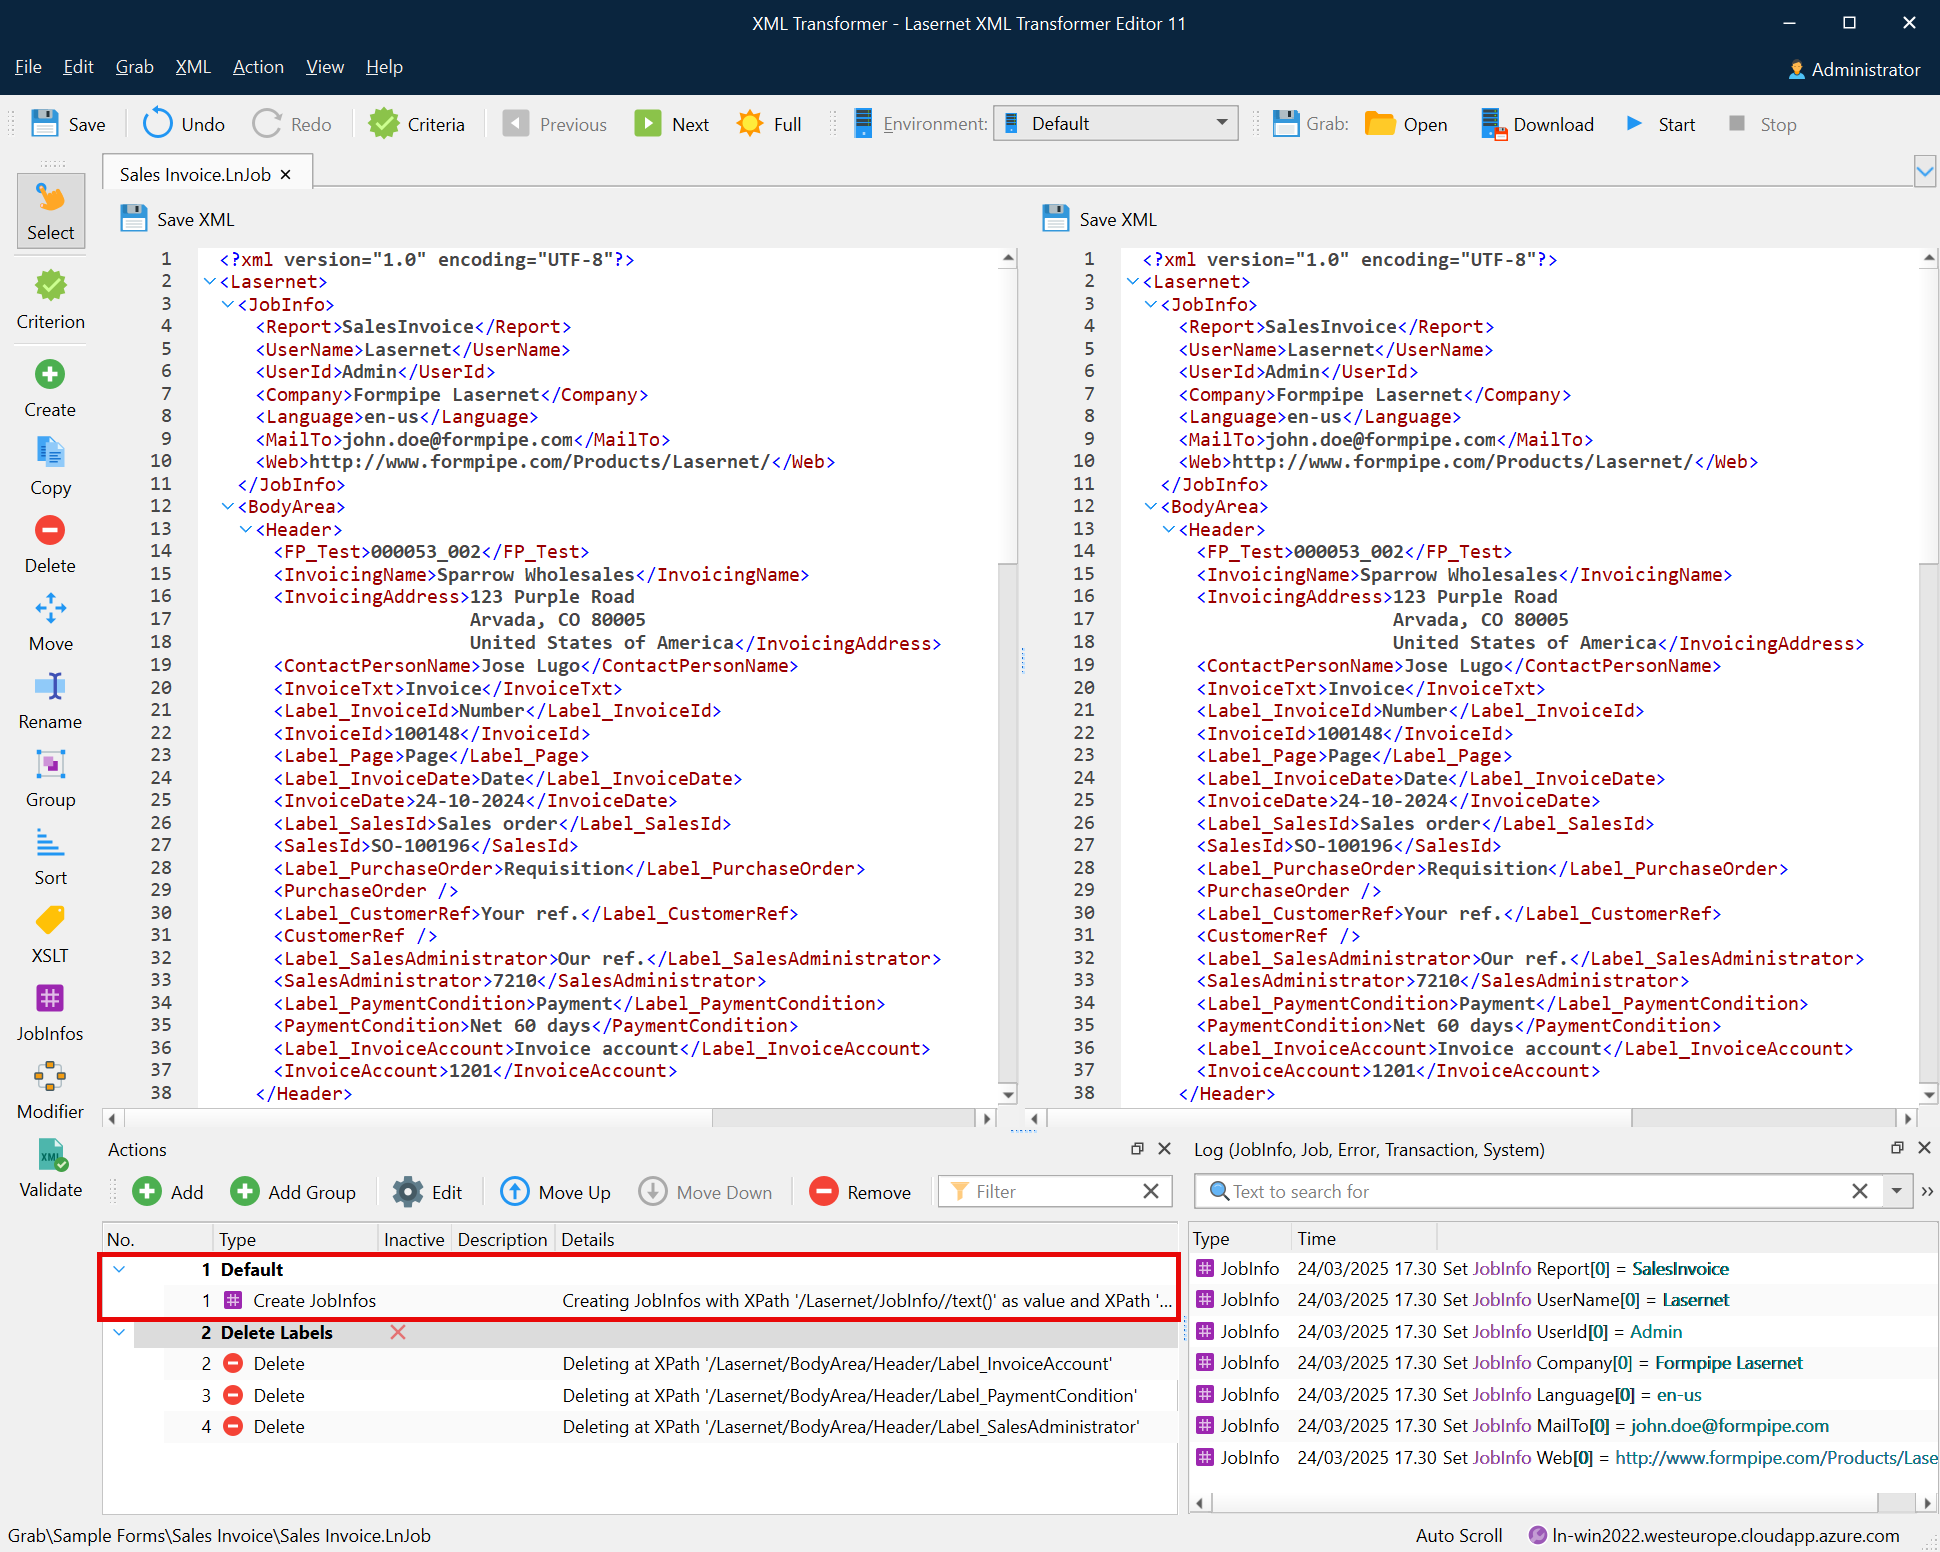
The Default group is created by default, and all the actions you create are added to this group until you move them to another one, if needed. If you have more groups, except for the Default one, every new action you create is added to the group which is currently selected in the Actions panel.
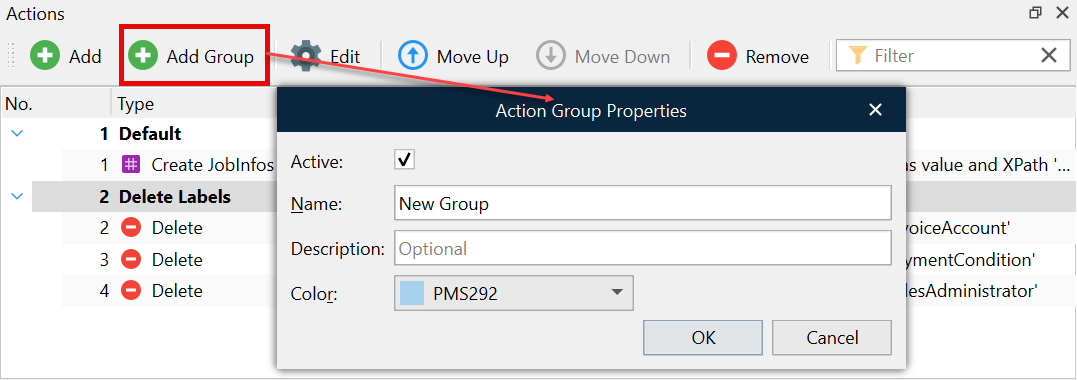
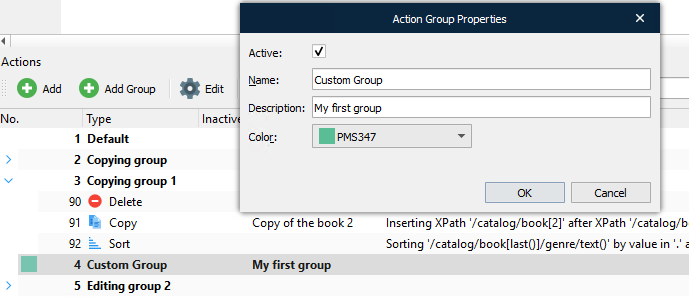
To create a group, click the Add Group button on the Actions panel. In the Action Group Properties dialog that appears, define the required properties (the Name text box is a required field), and then click OK.
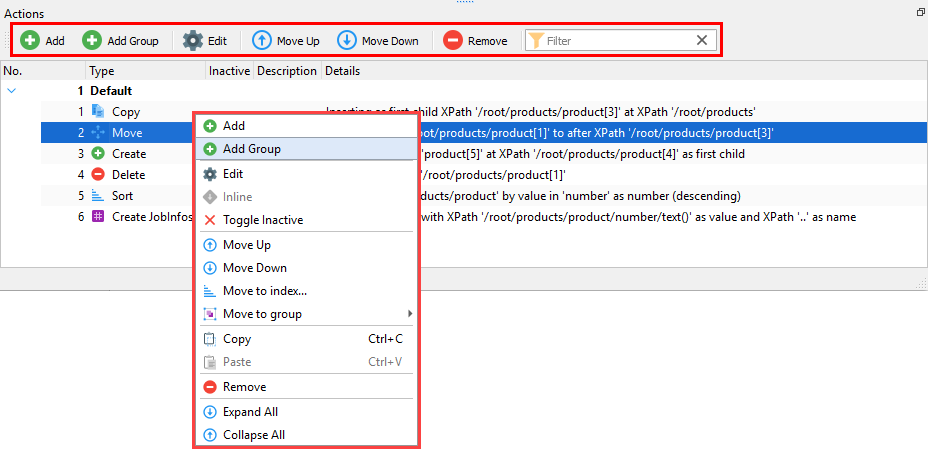
Managing Actions and Groups
Once you have created an action or a group, it is shown in the Actions panel of the XML Transformer Editor form. For more details, see Overview.
Use the panel to add an additional action or a group, edit or remove existing actions/groups, change the order of actions/groups, etc. The following commands are available on the Actions panel:
Add – Displays the Add Action dialog. Manually fill in the required fields and click OK.
Note: This is an alternative to using the toolbox commands. The options in the dialog will change depending on the selected Action type.
Add Group – Displays the Action Group Properties dialog, enabling you to Add a group. Fill in the fields as required and click OK.
Note: The new group will be inserted after the Group in which the selected Action is contained.
Edit – Displays a dialog enabling you to edit the selected Action(s) / Group(s). Alternatively, double-click an Action(s) / Group(s) to edit it. Modify the settings as required and click OK.
Toggle Inactive – Toggles the selected Action between active / inactive states.
Move Up – Moves the selected Action(s) / Group(s) up.
Move Down – Moves the selected Action(s) / Group(s) down.
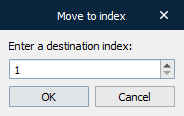
Move to index… – Displays the Move to index dialog, enabling you to move the selected Action(s) to a specified index.
Move to group – Displays a menu from which you select a group. The selected Action(s) are added to the end of the selected Group.
Copy – Copies the selected Action(s) / Group(s) to the clipboard.
Paste – Pastes the Action(s) to the selected Index.
Note: If you copy multiple groups, all Actions will be pasted into the same group.
Remove – Removes the selected Action(s) / Group(s).
Expand All – Expands all Groups.
Collapse All – Collapses all Groups.
Alternatively, use the context menu to perform any of the actions mentioned above.
In addition, you can also manage actions using the toolbar.

To apply all the actions you have added, click the Full button on the toolbar. You can view the result in the output XML file.
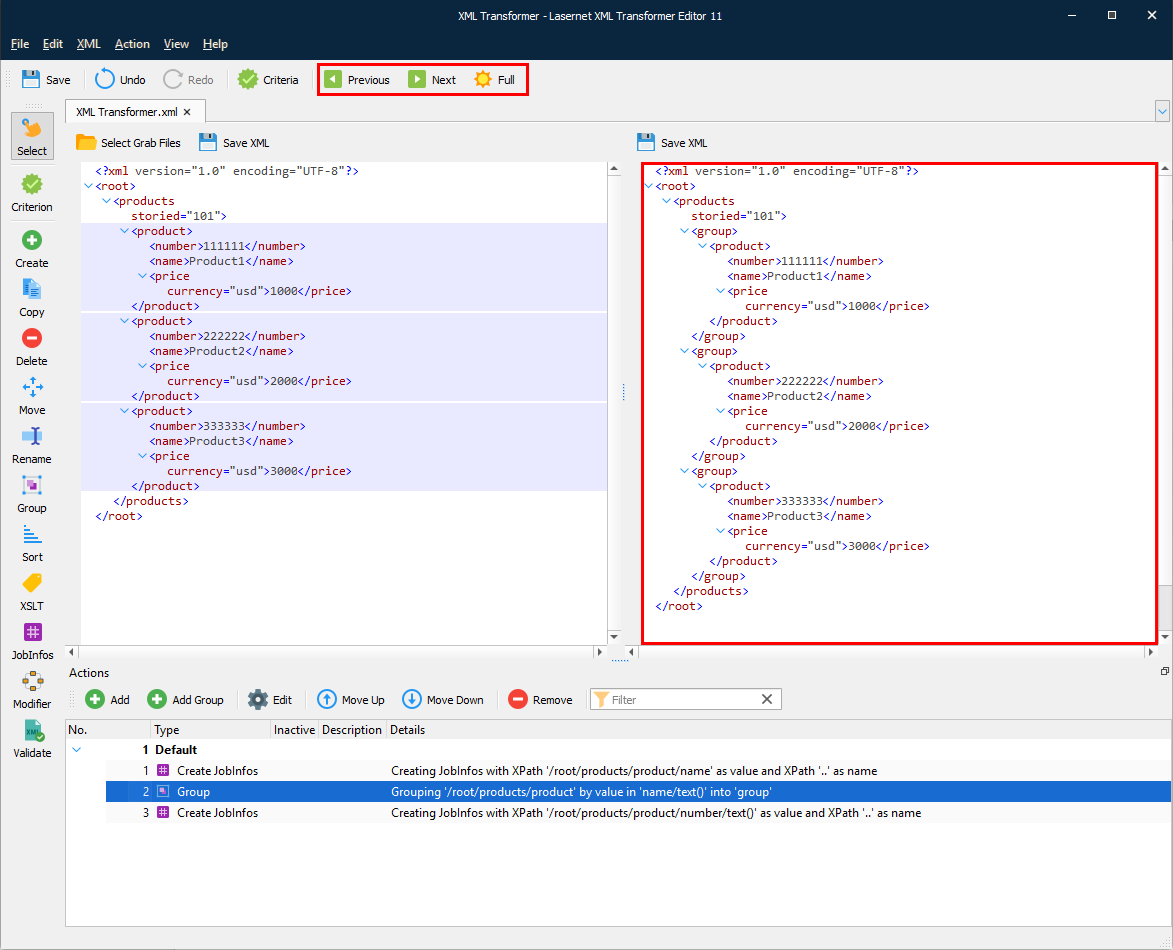
To view the results of the previously applied action, click the Previous button.
To view how the next action in the list affects the XML file, click the Next button.