

Applies to: Lasernet Core 11
The Outlook Mail module integrates directly with Office 365 to send emails.
To set up the module, follow this process:
Optionally, configure custom MIME headers.
Configure Authentication
Note
Lasernet Core 11.2 and later do not support user authentication.
Refer to the information for the version of Lasernet Core that you are using.
Lasernet Core 11.0 and 11.1
Select Authentication Type
Select which type of authentication the module will use:
User: The module authenticates as a user.
Application: The module authenticates as an application registered in Entra ID.
Authenticate as a User
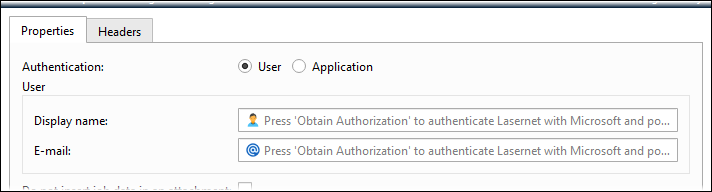
Set Authentication to User, then click Obtain Authorization to access the account for your organization and to autofill the Display name and E-mail fields.
The Outlook Mail module will obtain authorization to:
Maintain access to data to which you have granted access.
Configure individual permission to send mail on behalf of yourself.
Sign you in and read your profile.
The Remove Authorization button deletes the obtained authorization.
Note
Obtain Authorization and Remove Authorization are available only when you select User authentication.
User Authentication Properties
Display name | Display name for the account (click Obtain Authorization to autofill this field). |
E-mail address for the account (click Obtain Authorization to autofill this field). |
Authenticate as an Application
Application authentication for Outlook Mail communication requires that:
Lasernet Core is registered as an app by an Entra ID admin.
In Entra ID, the app has
Mail.ReadWriteandMail.Sendpermissions.The Entra ID admin must provide a ClientID and Client Secret for the module to use to sign in.
Important
Before implementing application authentication for this module, see Understand the Security Implications of Application Authentication for Outlook Mail, OneDrive, and SharePoint Modules. Although that article primarily applies to Lasernet Core 11.2 and later, the Delegated vs. Application Authentication, Permissions Required by Each Module, and Reducing the Scope of Access sections also apply to Lasernet Core 11.0 and 11.1.
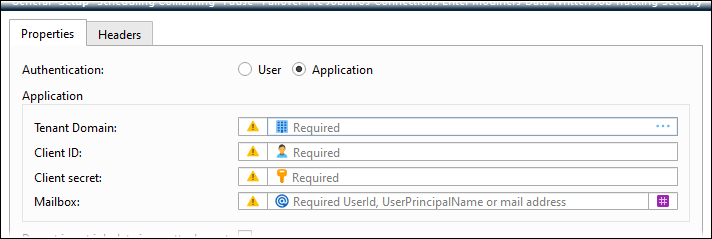
Set Authentication to Application, enter Client ID and Client secret (and complete any other necessary settings such as Tenant Domain and Mailbox), then click Refresh Access Token.
Note
If the client ID and client secret change in the future, repeat the step above and then commit and deploy the Lasernet Core configuration. Doing this ensures that the module remains authenticated.
At any time, you can click Refresh Access Token to test that the currently provided credentials are valid. When you click the button, Lasernet Core attempts to use those credentials to obtain a new access token.
Application Authentication Properties
Tenant Domain | Enter the relevant tenant domain. |
Client ID | The Entra ID admin must provide a client ID for the module to use for authentication. |
Client Secret | The Entra ID admin must provide a client secret for the module to use for authentication. |
Mailbox | Specify the mailbox to access (as a UserId, UserPrincipalName, or mail address) |
Refresh Access Token
If Lasernet Core experiences issues connecting to Outlook Mail, there might be a problem with its current security tokens. In some cases, the Refresh Access Token button can resolve connection issues.
Connection issues can occur for a number of reasons, including:
More than 90 days of inactivity (user authentication).
The user changed their password (user authentication).
Permission or security changes to the user (user authentication).
Revocation of permissions (user authentication or application authentication).
If Lasernet Core experiences connection issues, try the following steps (depending on the authentication method used).
User Authentication
Click Refresh Access Token to obtain new tokens, then commit and deploy the Lasernet Core configuration.
If doing this does not resolve the issue, click Remove Authorization to remove the currently stored security tokens, then click Obtain Authorization to reauthenticate using the user account (which will also refresh the security tokens). Then, commit and deploy the Lasernet Core configuration.
Application Authentication
Click Refresh Access Token to obtain new tokens, then commit and deploy the Lasernet Core configuration.
Lasernet Core 11.2 and later
Application authentication for Outlook Mail communication requires that:
Lasernet Core is registered as an app by an Entra ID admin.
In Entra ID, the app has
Mail.ReadWriteandMail.Sendpermissions.The Entra ID admin must provide a ClientID and Client Secret for the module to use to sign in.
Important
Before implementing application authentication for this module, see Understand the Security Implications of Application Authentication for Outlook Mail, OneDrive, and SharePoint Modules.
To configure the module’s authentication, follow these steps:
Enter Client ID and Client secret (and complete any other necessary settings such as Tenant Domain and Mailbox)
Click Refresh Access Token.
.png)
Note
If the client ID and client secret change in the future, repeat the step above and then commit and deploy the Lasernet Core configuration. Doing this ensures that the module remains authenticated.
At any time, you can click Refresh Access Token to test that the currently provided credentials are valid. When you click the button, Lasernet Core attempts to use those credentials to obtain a new access token.
Application Authentication Properties
Tenant Domain | Enter the relevant tenant domain. |
Client ID | The Entra ID admin must provide a client ID for the module to use for authentication. |
Client Secret | The Entra ID admin must provide a client secret for the module to use for authentication. |
Mailbox | Specify the mailbox to access (as a UserId, UserPrincipalName, or mail address) |
Provide Values for Other Module Properties
Use the following information to complete the module configuration.
Do not insert job data in an attachment | If selected, an email will be sent without including JobData as an attachment. EWS server reports a non-critical error log message when sending emails without attachments:
|
Request Read Receipt | If selected, a receipt will be sent to the email address when the recipient opens the email.
|
Request Delivery Receipt | If selected, a delivery receipt will be sent to the email address when the message is successfully delivered to the recipient. A JobInfo overrides the default behavior.
|
Save copy in Sent Item folder | If selected, a copy of the e-mail will be stored in the Sent Items folder in your email client. |
Validate e-mail address syntax | If selected, the email syntax in MailTo, MailCC, and MailBCC will be validated before sending the email to the mail server. If the syntax is not valid, the job will fail. To prevent a job from failing the setting must be deactivated. This will allow mail addresses to contain syntax used for external fax systems connected to mail servers. Comma and semicolon are valid as separators if MailTo, MailCC, or MailBCC contain multiple addresses. |
Importance | Set the category of importance to Low, Normal (default) or High. |
Create draft without sending it | If selected, a draft will be created to manually open and edit the e-mail before sending from mailbox. |
Headers
Optionally, you can add custom MIME headers to the emails sent by an Outlook Mail Output module. Some possible uses for custom headers are to enable the sending organization to troubleshoot delivery issues by examining unique codes in the header data in bounced emails, and to enable enhanced workflow visibility by enabling the organization to track emails back to their originating Lasernet Core process or job.
You can add up to five custom headers.
The Outlook Mail Output module will add the configured custom headers to outgoing email and give each header the specified value. A custom header’s Name must start with X- or x-; for example, x-Invoice-Number.
You can specify a static value for a header; for example, Lasernet Core Mail. Else you can use JobInfo substitution if you want header values to be dynamic. For example, you could enter a JobInfo reference (like #InvoiceNumber#) as the header’s Value.
If a mail is bounced back to the sender and is read by Lasernet Core’s Outlook Mail Input module, Lasernet Core creates JobInfos that have names and values corresponding to the custom headers in the bounced email.
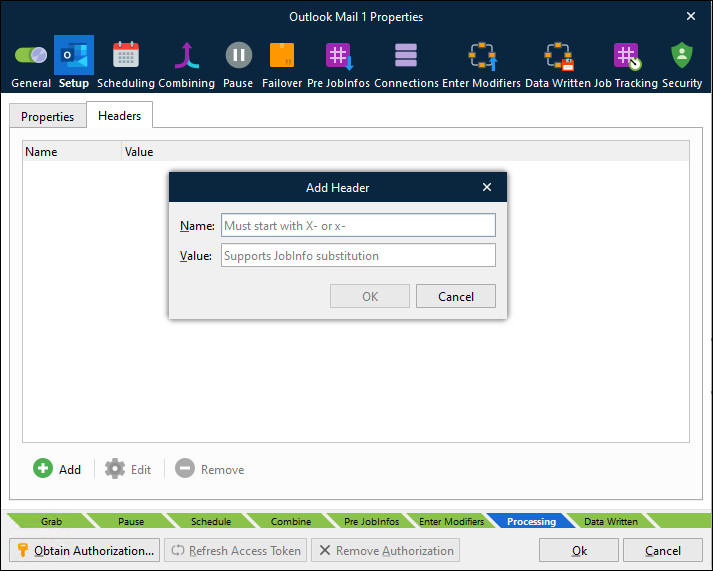
Name | The name of the custom header must start with X- or x-. |
Value | Set a value for the header. Supports JobInfo substitution. |