
Applies to: Lasernet Core 11
To process jobs, a Lasernet Core environment must be appropriately licensed. A Lasernet Core license permits the use of specified modules and packages. It is important that the license that is applied to an environment permits the use of the Lasernet Core functionality that jobs rely on.
A crucial stage in making a Lasernet Core system operational is adding a license to Lasernet Config Server and applying that license to environments.
Additionally, you might also sometimes need to:
Remove a license from Lasernet Config Server and deactivate it, so that it can be applied to a different Lasernet Config Server or replaced with a different license.
Synchronize a license’s details with the Lasernet Group license server. For example, you do this when you add capabilities to your Lasernet Core license. In that scenario, the Lasernet Group updates the license’s details in the Lasernet Group license server, and then you synchronize your license to update its details to match.
Important
Lasernet Config Server automatically connects to the Lasernet Group license server to activate, synchronize, and deactivate Lasernet Core licenses. For this reason, the server that Lasernet Config Server is running on must have internet access when you activate, synchronize, or deactivate Lasernet Core licenses. If it does not, you must follow the offline activation, synchronization, or deactivation process.
Note
Lasernet Developer 11 does not require a license.
Note
For license management information about Lasernet Core 10, refer to the following guides:
Add and Activate a License
An essential part of the Lasernet Core 11 installation and setup process is to add a license to the Config Server then apply it to Lasernet Core environments.
For instructions, see Apply Licenses to Lasernet Core Services in the Lasernet Core 11 Installation and Setup Guide.
Remove and Deactivate a License
At any time, a Lasernet Core license can be added to only one Lasernet Config Server. To add a currently in-use license to a different Lasernet Config Server, you must first remove it from the Lasernet Config Server it is currently applied to.
To do this, follow these steps.
Manage
In the System Configuration menu, click Licenses.
.png)
Click the tile for the license that you want to remove.
Check the license’s Environments property:
If the first part of the value is 0 (for example, 0 / 6), the license is not currently assigned to any environments and can be removed.
If the first part of the value is not 0, you must unassign the license from the environments that are currently using it.
If required: To unassign the license from the environments that are currently using it, follow these steps:
In the System Configuration menu, click Environments.
Click the tile of an environment that is currently using the license.
In the environment’s properties pane, do one of the following actions:
Select a different license from the Licences list.
Click the currently selected license in the Licences list to deselect it. After you do this, no license is selected, which will make the environment unlicensed.
Click Confirm.
Repeat these steps for all environments that are currently using the license.
Return to the Licenses page.
Click the menu button (three vertical dots) on the tile for the license that you want to remove.
Click Delete.
In the Delete Licence? window, click Confirm.
Lasernet Config Server will remove the license.
Next, it will contact the Lasernet Group license server to deactivate the license. After this has been done, you can add the license to another Lasernet Config Server.
However, if the server does not have internet access, you must follow the offline license deactivation process before you add the license to another Lasernet Config Server.
Lasernet Config Web App
Note
The Lasernet Config web app was provided with earlier versions of Lasernet Core. It is a legacy web app and will be deprecated in a future version of Lasernet Core.
Expand for information
Sign in to the Lasernet Config web app.
In the Tools menu, click Licenses.
In the license table, check the Environments column for the license that you want to remove.
If the first part of the value is 0 (for example, 0 / 6), the license is not currently assigned to any environments and can be removed.
If the first part of the value is not 0, you must unassign the license from the environments that are currently using it.
If required: To unassign the license from the environments that are currently using it, follow these steps:
In the Tools menu, click Environments.
Click an environment that is currently using the license, then click Edit.
In the Edit Environment window, click the License tab.
In the License list, select a different license, or select the blank entry in the list (which will make the environment unlicensed).
Click OK.
Repeat these steps for all environments that are currently using the license.
Back on the Licenses page, click the license that you want to remove.
In the toolbar, click Remove.
In the Delete License window, click OK.
Lasernet Config Server will remove the license and then contact the Lasernet Group license server to deactivate it. After this has been done, you can add the license to any Lasernet Config Server.
However, if the server does not have internet access, you must follow the offline license deactivation process before you add the license to another Lasernet Config Server.
Offline License Deactivation
When you remove a standard Lasernet Core license from the Config Server, it must be deactivated on the Lasernet Group license server before you add it to another Lasernet Config Server.
When an internet connection is available, the Config Server connects to the Lasernet Group license server to deactivate the license.
If an internet connection is not available, Manage (or the Lasernet Config web app) will display a deactivation code that you must enter into the Lasernet Offline Activation portal (along with your Lasernet activation code) from an internet-connected device. The Lasernet Offline Activation portal will deactivate the license for you.
Offline Deactivation Steps
If an internet connection is not available when you remove a license from the Config Server, follow these steps:
If you remove a standard Lasernet Core license from Config Server but the Lasernet Group license server cannot be reached, Manage displays a deactivation code and activation code. Copy these codes.
Important
You must copy the activation code and deactivation code when they are displayed. After you close the window, it is not possible to display the deactivation code again. If you do close the window without noting the code, contact Lasernet Support .
Manage
.png)
Lasernet Config web app
.png)
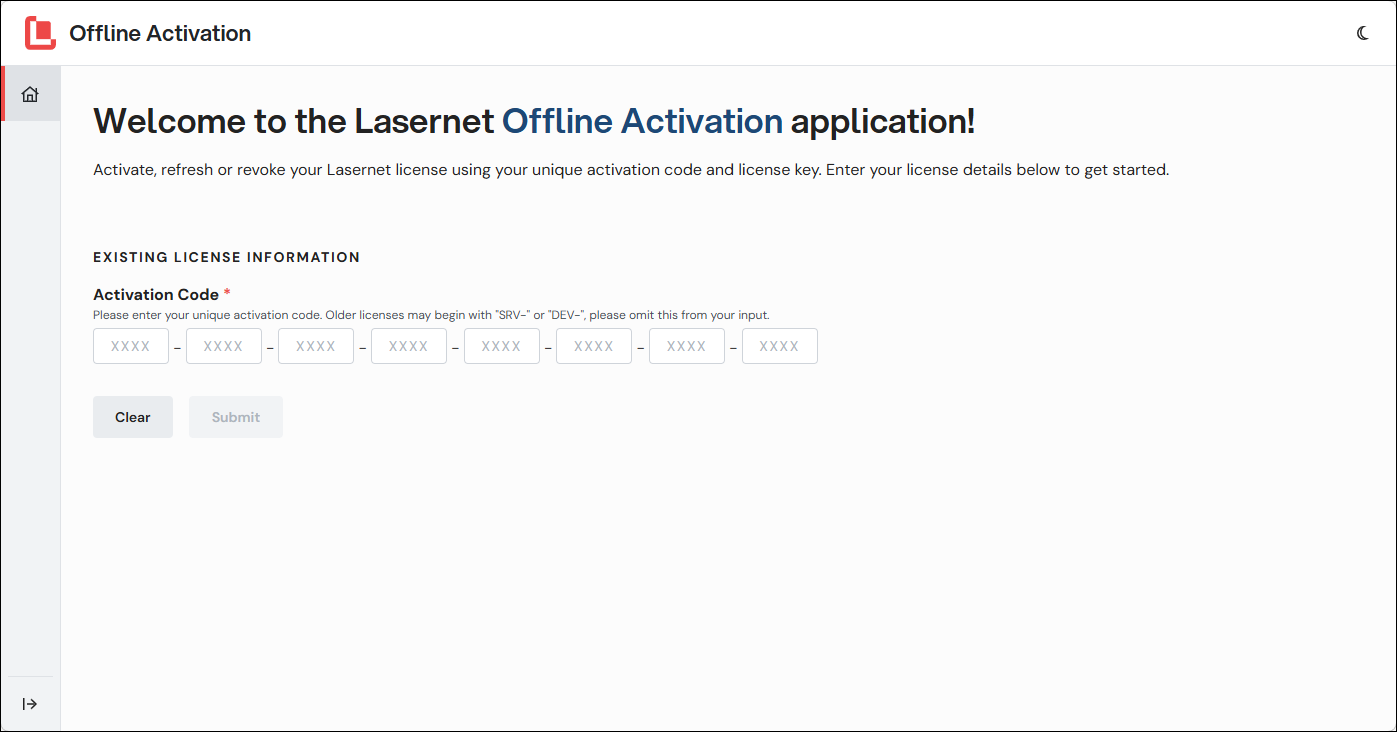
Go to the Lasernet Offline Activation portal and enter the activation code, then click Submit.
.png)
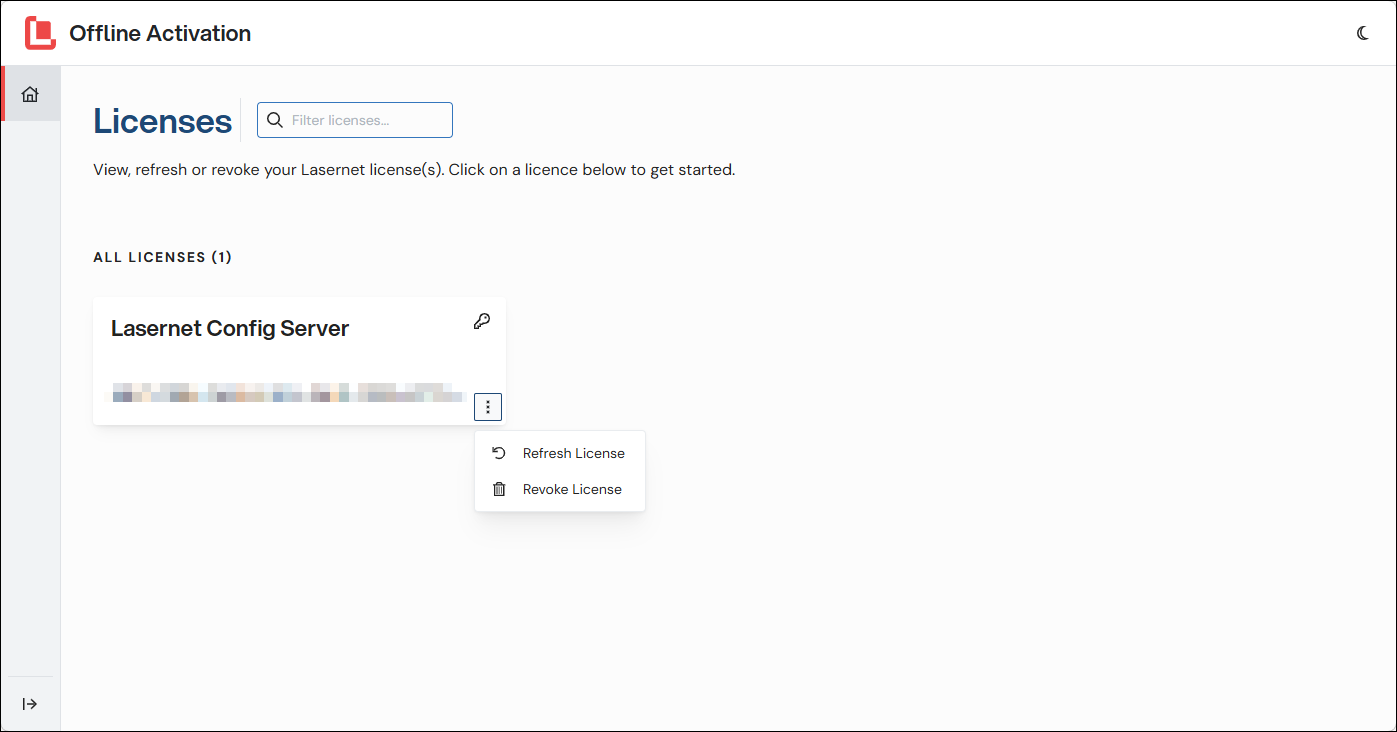
On the second page of the process, click the menu button (three vertical dots) on the license’s tile.
Click Revoke License.

In the Revoke License window, enter the deactivation code, then click Confirm.
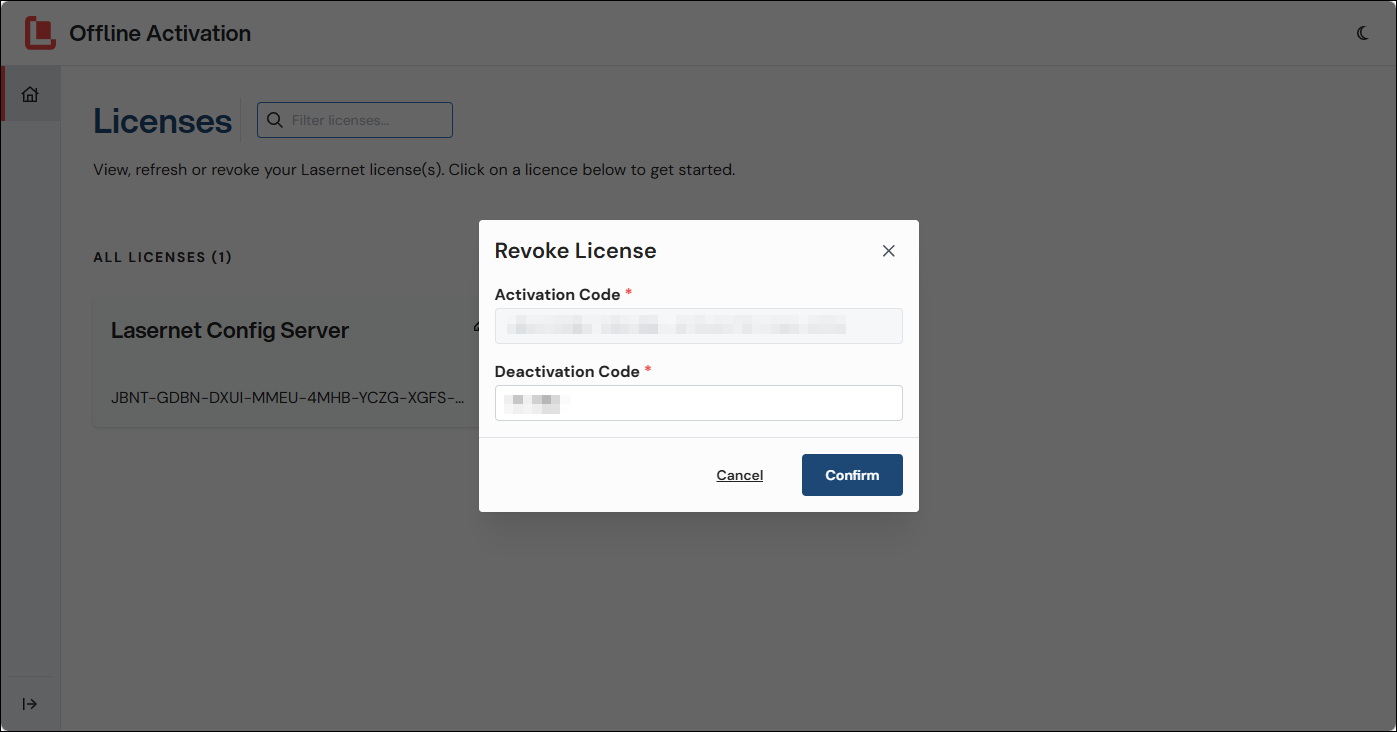
The license is now deactivated.
Synchronize a License
If the Lasernet Group changes your license’s properties (for example, because you purchased additional capabilities for your Lasernet Core license), you must synchronize that license in Lasernet Config Server. Doing this updates the license in Lasernet Config Server, which makes the new capabilities available to Lasernet Core environments.
Note
Sync license is not applicable to demo licenses.
To do this, follow these steps.
Manage
In the System Configuration menu, click Licenses.
.png)
Click the menu button (three vertical dots) on the tile for the license that you want to synchronize.
Click Sync Licence. Lasernet Config Server will contact the Lasernet Group license server and update the license. To check the license’s updated properties, click the license’s tile and refer to the Packages and Modules areas of its properties pane.
Note
If the server does not have internet access, Manage will display a Sync Licence Failed. Activation server is not available. Please go to the self-service portal to download an updated license message. You must follow the offline license synchronization process.
Lasernet Config Web App
To synchronize a license, select it on the Licenses page, then click Sync license in the toolbar. Lasernet Config Server will contact the Lasernet Group license server and update the license.
To check the license’s properties, double-click it (to open the License Properties window) and review the information on the Modules and Packages tabs.
Note
If the server does not have internet access, Manage will display an error message. You must follow the offline license synchronization process.
Offline License Synchronization
An essential part of the license synchronization process is that an updated license, which matches the new set of Lasernet Core capabilities that you have purchased, is added to Lasernet Config Server. After you do this, Lasernet Core environments that are assigned that license can use those capabilities.
When the server has internet access, this is done automatically over the internet when you click Sync Licence.
If the server does not have internet access, you must use the Lasernet Offline Activation portal to download an updated license, which you upload to Lasernet Config Server.
Offline License Synchronization Steps
To do this, follow these steps:
Go to the Lasernet Offline Activation portal and enter your activation code, then click Submit.
Note
Your activation code was supplied to you with your initial purchase of Lasernet Core.
On the second page of the process, click the menu button (three vertical dots) on the license’s tile.
Click Refresh License.
In the Refresh License window, click Confirm. Download the updated license file that the Lasernet Offline Activation portal provides you.
In Manage (or the Lasernet Config web app), upload the new license file.
The license is now updated in Lasernet Config Server.
Switch a Lasernet Core Environment to Use a Different License
To change which license is applied to a Lasernet Core environment, follow these steps.
Manage
In the System Configuration menu, click Environments.
Click the tile of the environment that you want to modify.
In the environment’s properties pane, select a different license from the Licences list.
Click Confirm.
Lasernet Config Web App
In the Tools menu, click Environments.
Click the environment that you want to modify, then click Edit.
In the Edit Environment window, click the License tab.
In the License list, select a different license.
Click OK.